
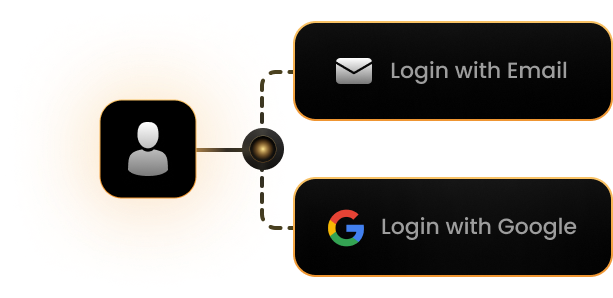
With the rise of microservices, interconnected applications, and even AI, all enabled by APIs, secure access has become an increasingly complex challenge. In a previous article, and with the help of AI itself, I discussed using something called Authorization Code Flow — a key aspect of both the OIDC and OAuth 2.0 protocols — in order to obtain an OIDC ID Token that an application can use to verify user Authentication.
I’m going to carry on in a similar vein and, with the help of AI, extend the process to help protect some APIs as part of a CIAM integration. My name’s Peter Fernandez, and in this article — together with its accompanying video — I’ll be showing you how Vibe coding helped me integrate the use of OAuth 2.0 Access Tokens to help me protect my first-party APIs in the context of my first-party Application.
I’ve also created a GitHub repo here, where you can grab the code associated with my various Vibe coding exploits in the context of the "my-nextjs-app" — as in the code I’m creating as part of this article, as well as the code created as part of the previous article, too.
What is a First-Party API?
You may be asking yourself what I mean when I say “first-party”? A first-party API is essentially an API — in OAuth 2.0 terms, also referred to as a Resource Server — that I, as a developer, have written.
It differs from a third-party API, which is essentially an API that someone else has developed (i.e. to access some other resources and for some other use case) and that I’m using in my first-party application. I’m actually going to be Vibe coding third-party API access as part of a CIAM integration, but that’s a topic for a future article.
Together with a first-party application, a first-party API is owned and maintained by the same organisation. For instance, a mobile banking app developed by a bank, say, will typically access the bank’s own APIs as a first-party app.
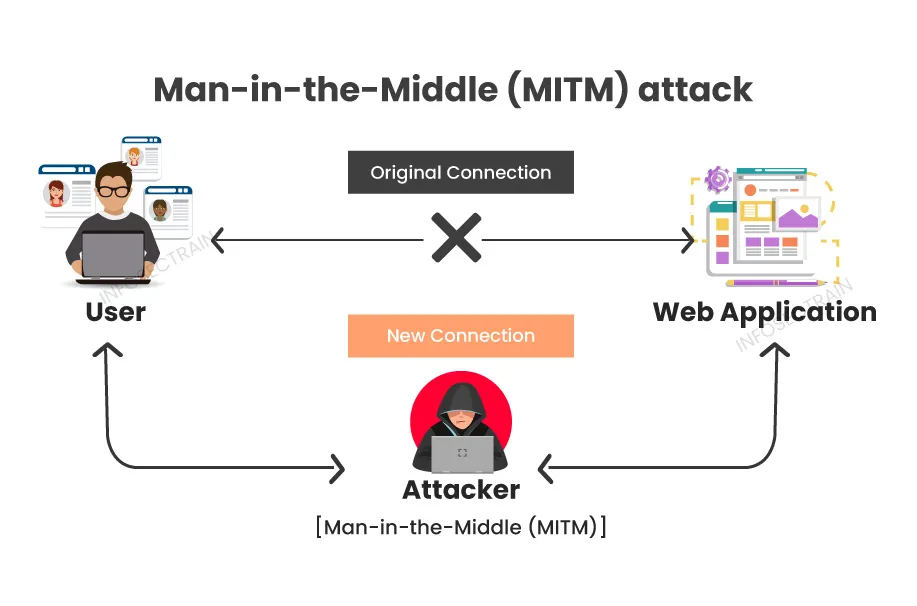
Now, you may be thinking, why use OAuth 2.0 in first-party workflows at all? Well, even if all aspects of a SaaS solution have the same ownership, communication between these will typically happen across the internet.
Once that occurs, an interface is publicly accessible: irrespective of whether or not HTTPS is being employed for data security, the power of any web-based API stems from the fact that it has global accessibility.
Integrating OAuth 2.0 even for wholly first-party scenarios provides a consistent mechanism to protect access from unauthorised parties — human or otherwise — in a way that neither Basic Authentication nor an API Key can easily achieve:
- Secure Auth: with no need to share credentials.
- Standardised Auth Flow: making security easier to audit and scale.
- Token-Based Access: supporting stateless and scalable API design.
- Access Control: using the likes of RBAC overlaid on scopes and claims.
- Standards-based Integration: leveraging profiles and policies enabled via Social identity and (enterprise) Federation.
- Security Best Practices: enabling features like token rotation, revocation, and session management.
What is a First-Party Application?
As you’ve likely already surmised, a first-party application is one that I’ve also built…as opposed to a third-party application, which is one that someone else has built and wants to use to call my API. The distinction is important, as a first-party application/API combination typically implies a number of important things:
- Trusted by the same resource owner.
- Often tightly integrated with internal systems and services.
- Can be deployed across multiple platforms (e.g. web, mobile, desktop).
- Shares branding and compliance requirements with backend systems and the like.
Adding my API
Ok. Building on the code from my previous article, I’m going to be using Copilot to help me add some APIs. Now, a regular Web Application — which is essentially what a Next.js app is — will typically have backend routes that function similarly to APIs.
They’re not typically thought of as being APIs for the fundamental reason that they are typically stateful — i.e. rely on the application state to determine the likes of security, accessibility, etc. APIs are typically stateless — what is commonly referred to as RESTful — where the use of REpresentational State Transfer means that each API call carries with it all the context required.
With Next.js, however, there’s no reason to prohibit the incorporation of an API as part of the application; an API is essentially a confidential client, as in a server-side component, which, of course, Next.js supports.
You don’t build an API as part of a SPA, say, nor a (native) Mobile App, as these are what are typically referred to as public clients and they execute without a backend. Building an API as part of the "my-nextjs-app" app is beneficial for a number of reasons, not least of which is that it makes it easier when it comes to deployment and management — e.g. no need to stand up a separate service just to support the various API routes and endpoints.
It also means that I can readily support the use of additional devices/technology platforms as part of the SaaS solution I’m building; in a future article, I’ll be showing you how I Vibe coded a CIAM-integrated implementation of an iOS Mobile App that uses the API I’m building in this article, so stay tuned for more on that.
Whether you’re building an application in Next.js, an API in Next.js, or some combination of both, Vercel — the creators of Next.js — offer development/production hosting services in a 3rd-party SaaS vendor fashion. However, as with a DIY CIAM solution, you can host a Next.js application within your already owned infrastructure should you choose.
I’m essentially creating two APIs, one for the purpose of creating a schedule and one for the purpose of managing the events that are part of the schedule. This isn’t an article about the architecture of event scheduling, so I won’t labour on the reasons for taking that approach. Nor the specifics.
I will, however, show you how I used Copilot to create the schedule API, and also how I used Copilot to add the scheduled event API as a sub-route. This article will focus on just the CRUD — Create, Read, Update and Delete — operations associated with the former for now, with what I went through applied to the latter at your leisure.
What Copilot came up with as a route for the Schedule API, with some of the various endpoints it provided, can be seen below; you can see more of the actual process in the accompanying video, too 🤗
The API I’m illustrating is an example taken from a B2B SaaS I’m building, which incorporates a PHP Resource Server backend implementation. So it’s illustrative of a real-world scenario, but for the purpose of this article, doesn’t include the full scope of implementation.


As a first pass, the AI did a fairly reasonable job — I mean, it created the various endpoints I requested, and after a little re-prompting, it also created the routes I asked for. It certainly took the legwork out of writing the actual lines of code 🎉
Of course, it didn’t add any security (more on that below) but to be fair, I didn’t explicitly ask it to; if you’re watching the accompanying video, you’ll see (screenshot above) my actual prompt to Copilot mentions nothing about security.
Both context and the language you use are important: when using generative AI, that’s an aspect worth remembering. I recently came across this video by 3Brown1Blue that neatly illustrates how GPTs — Generative Progressive/Pre-trained Transform(er)s — work in conjunction with LLMs (Large Language Models), and provides some insight into why the way a prompt is phrased is important.
Another example of this can also be seen in my accompanying video, where I attempt to add a new sub-route API for managing scheduled events: because I used the word interface the AI thought I was talking about a TypeScript interface and didn’t give me what I intended. I had to go back and re-prompt, but I did keep the changes suggested as they did fix some errors in the generated code 😂
API Security
The first pass at generating the API creates something usable, but without any security (a closer look at the implementation generated by using Copilot shows that there’s absolutely no checking to see who, or what, is allowed access to the resources the API exposes).
There’s no check to see if the API is being used by something that’s passed authentication, or not, and there’s no access control checking either. Let’s fix that; you can see more on this process in the accompanying video, too. In this article, we’ll be addressing the former, which will also pave the way to address the latter in more detail at a future point 😁


Building a User Interface
With the help of AI, I also built a simple page to display a list of schedules and also perform a schedule creation operation; something you can also see in the accompanying video.
Copilot took its familiar approach and created a CSR (Client-Side Rendered) page by default. I was going to ask Copilot — well, GPT 4.1 to be precise — to change this, but then I thought, why not add some CSR into what is currently an all SSR (Server-Side Rendered) mix?
Actually, I did end up CSR’ing the home page to solve one of the follow-up exercise challenges in my previous article; see here in the GitHub repo for more information. However, that page did start its life as being SSR’d originally 😉
CSR vs SSR — or more specifically, Client-Side API calls vs Server-Side API calls — do throw up some interesting security implications, but let’s just go with it for now.
Below is the prompt I gave to Copilot, and what GPT-4.1 ended up producing; you can see it in action in the accompanying video I created for this article. I’ve not done anything fancy, and you have to navigate to the page manually (as in there’s no menu/menu items), but it’s interesting to see what the AI came up with.


Arguably, one could say that UI generation is de rigueur for a transform process, given that there’s so much information that can be used from a pre-trained perspective. But remember, with a GPT — at least a general-purpose one — we’re talking about pre-trained transformation from a language perspective, and it’s not always easy to “describe” a UI; I didn’t even try, so I guess I’m fortunate that I got even a minimalistic design! 😎
Maybe if I’d have used a more specific model tuned to UI generation, I would have obtained a more creative result 🤷🏻♂️ There’s nothing to stop me from mixing and matching AI technologies after all…
Perhaps because of a precedent already set, GPT-4.1 did include authenticated state checking within my UI, even though I hadn’t expressly asked it to. I think this is a good example where context (in this case, prior context) also plays an important part.
Calling the API
In order to get the UI output (illustrated above), there are a few things that obviously go on under the covers. After I got Copilot to generate the UI, fix for CSR, et al, I took a look at the code it had created and noticed that it was calling my API — specifically the HTTP GET endpoint, to start with, in order to get the list of schedules.
However — and it’s a big however, too — it was supplying the ID Token as the Bearer Token! 😳 I mentioned this to Copilot, and below is how it responded; at least it was gracious about its mistake 😉
For context, an ID Token should not be used as a Bearer token, and you can read more about the respective roles of the ID Token and the Access Token in my article entitled OIDC, SAML and OAuth 2.0.

The (rectified) Copilot solution is one that you see more often than not in code examples, namely: get an Access Token, store it, and use it to call your APIs. In this case, the Access Token is stored on the session created as part of the login, and I’ve included a screenshot below of the changes Copilot also suggested as part of route.ts.
It’s not a bad strategy, and for the most part, it works…especially for low-risk operations where having a longer-lived Access Token is not too much of a concern. What Copilot has done is to abstract getting the access token into a function, which theoretically will enable me to both (a) obtain a new token when the old one has expired, and (b) perform step-up authentication if I were to require an access token with additional scope(s) in the future.
I’m not going to go into detail in this article — more to come on this in a future article — but I did want to point that out as it’s illustrative of how “creative” generative AI can also be…even when it doesn’t necessarily intend to be 😎

Scope
Aside from typical claims like iss (issuer) and sub (subject) that can be found in a JWT format Access Token, a request via Authorization Code Flow allows a caller to specify custom scope as an additional parameter, which typically makes its way into the token via the scope claim.
Different implementations often do things differently. Auth0, for example, treats audience as a first-class citizen, and forces the definition of a custom API — with a mandatory identifier that becomes part of the aud claim — to which scope can optionally be attached. Keycloak, on the other hand, forces the definition of a scope — a.k.a. a Client Scope — which can be associated with one or more audience values.
An Access Token need not be in JWT format, and in the non-JWT case, Token Introspection is used instead to determine token suitability. Further, the aud claim is mostly specific to the OpenID 1.0 Core Specification, where the JWT format is mandated for a generated ID Token.
Arguably, there are pros and cons to each approach. In the case of Auth0, for example, some say it’s more intuitive — i.e. defining an API that has an associated audience makes sense, right? Well, audience isn’t a specific definition within the OAuth 2.0 spec, largely because OAuth 2.0 is all about an API rather than the API being some particular characteristic.
Not enforcing the use of scope, however, makes it easier for the various routes within an API to dispense with access checking from a consent perspective. Whilst OAuth 2.0 is not an access control protocol per se, implementations of an Authorization Server — especially those combined with an IdP — often layer the likes of RBAC on top, which adds access control functionality. If you’re not checking for access in your API, that out-of-the-box capability becomes redundant without you modifying your code!
To be clear, not validating scope within an OAuth 2.0 Access Token is not a recommended best practice, as it essentially violates the Principle of Least Privilege
Keycloak Definitions
Irrespective of which side of the coin you favour, and which implementation you prefer — i.e. Auth0, Keycloak, or something else — you will need to provide some sort of definition to the authorization server.
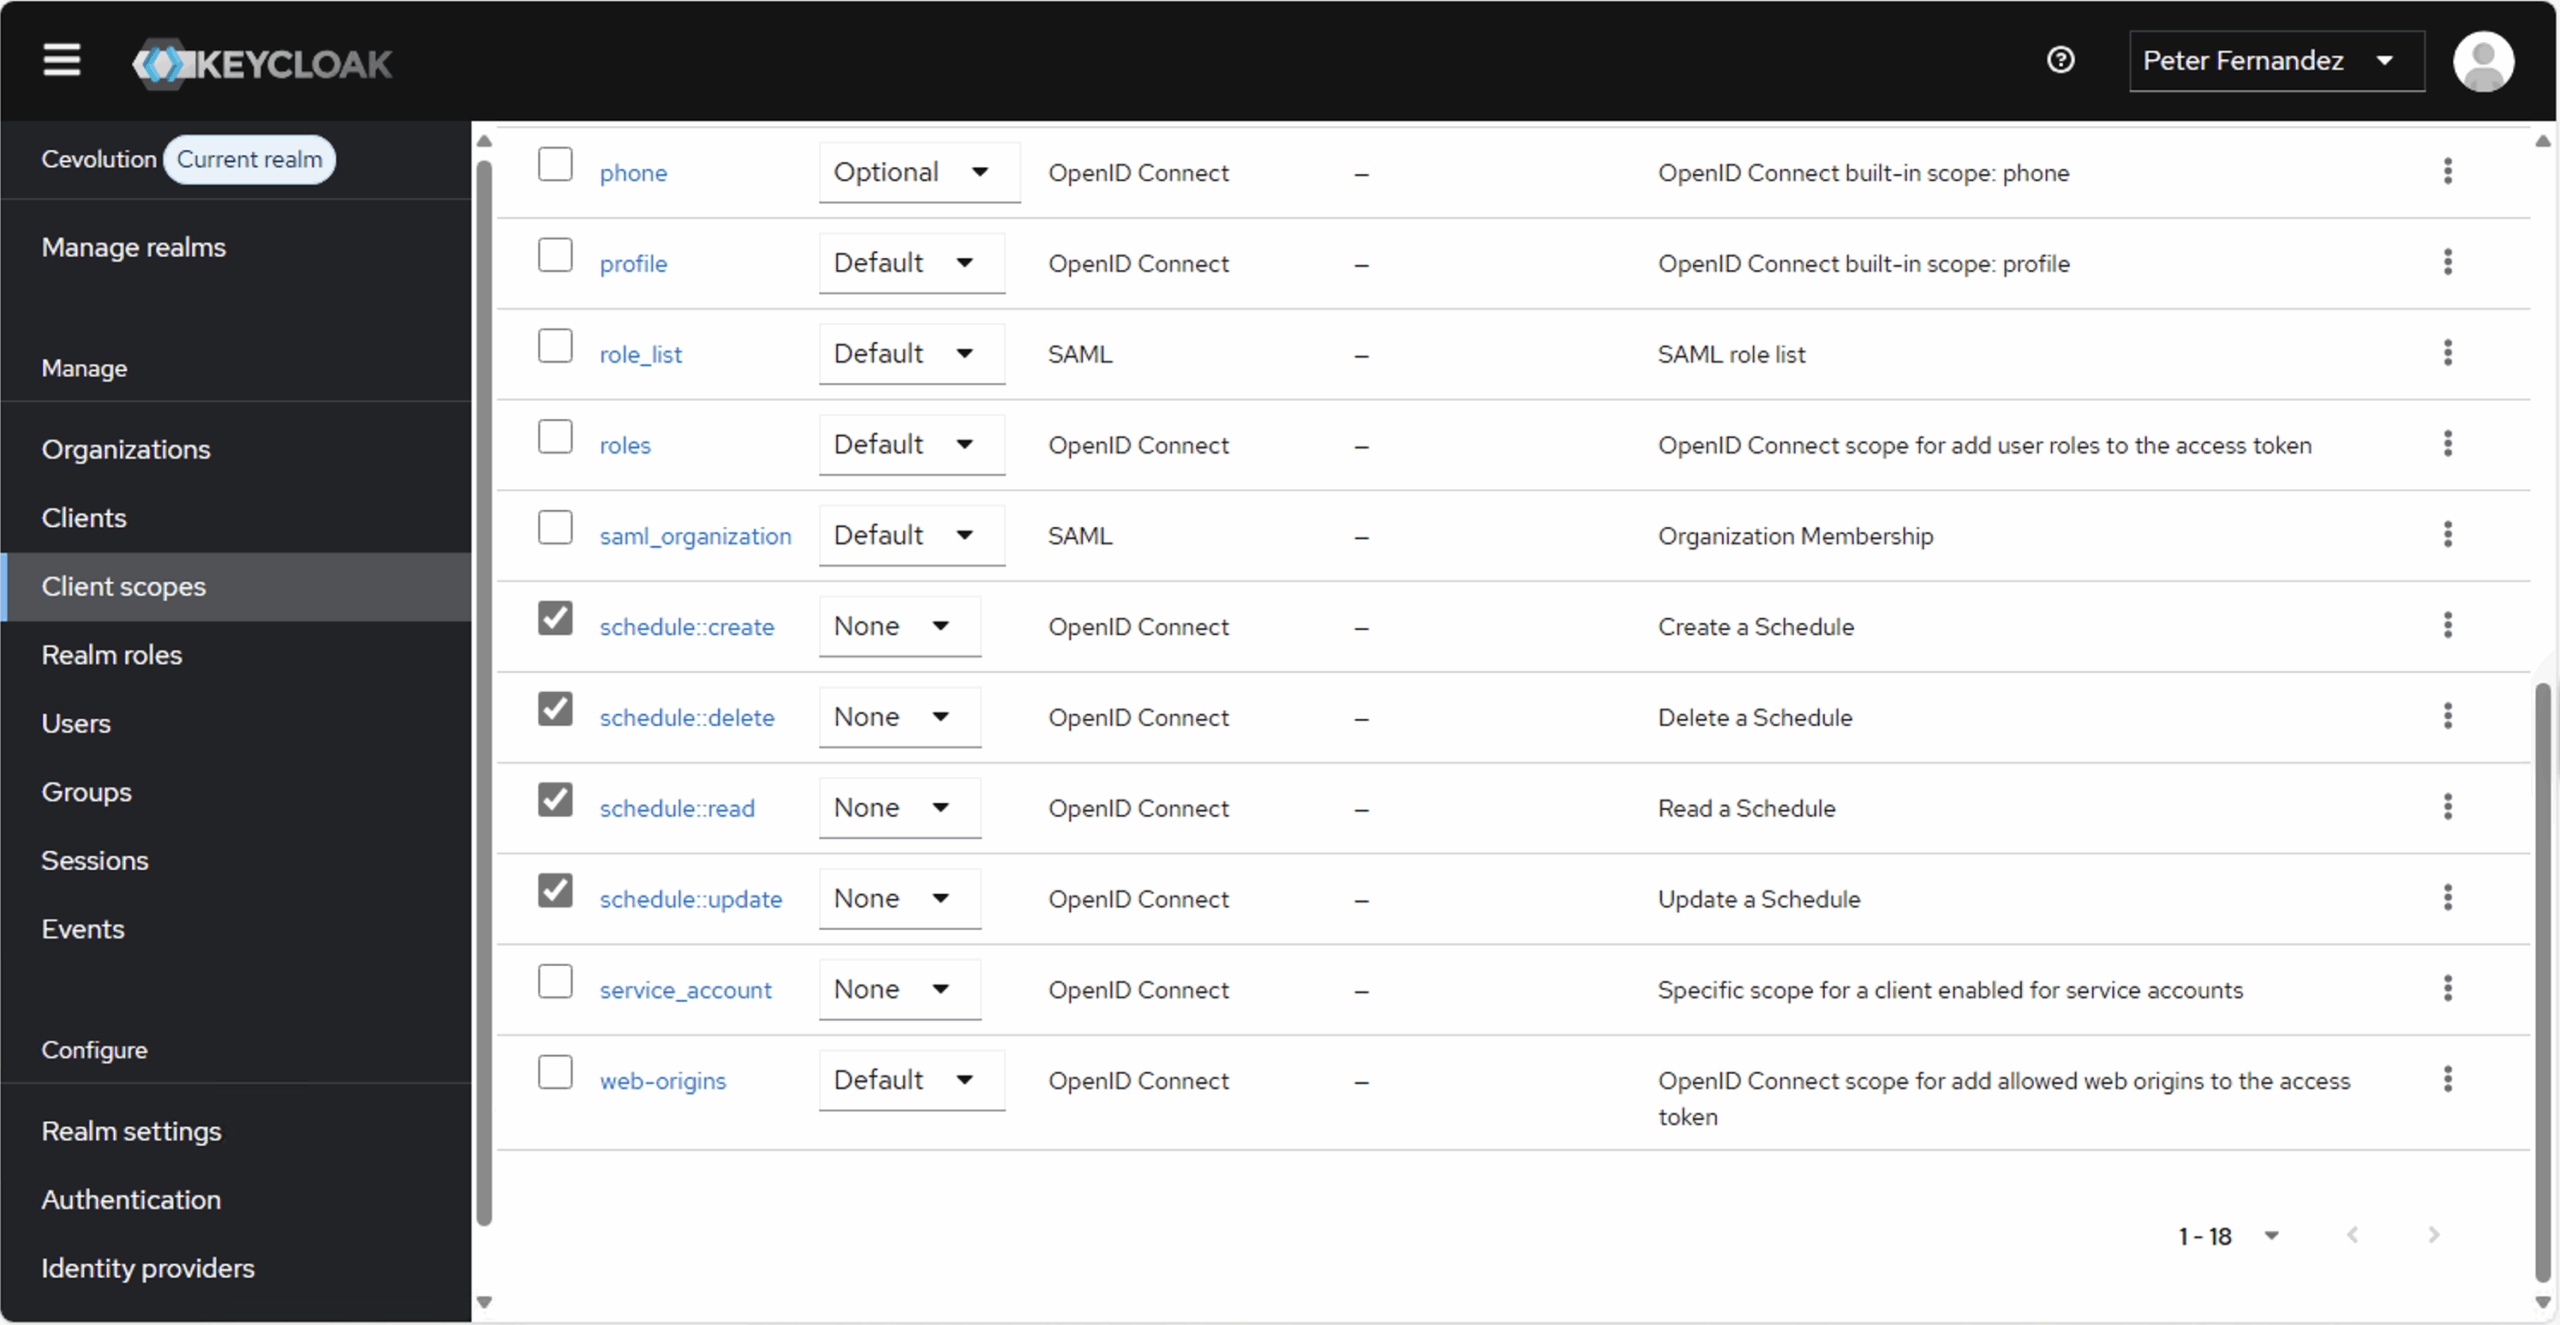
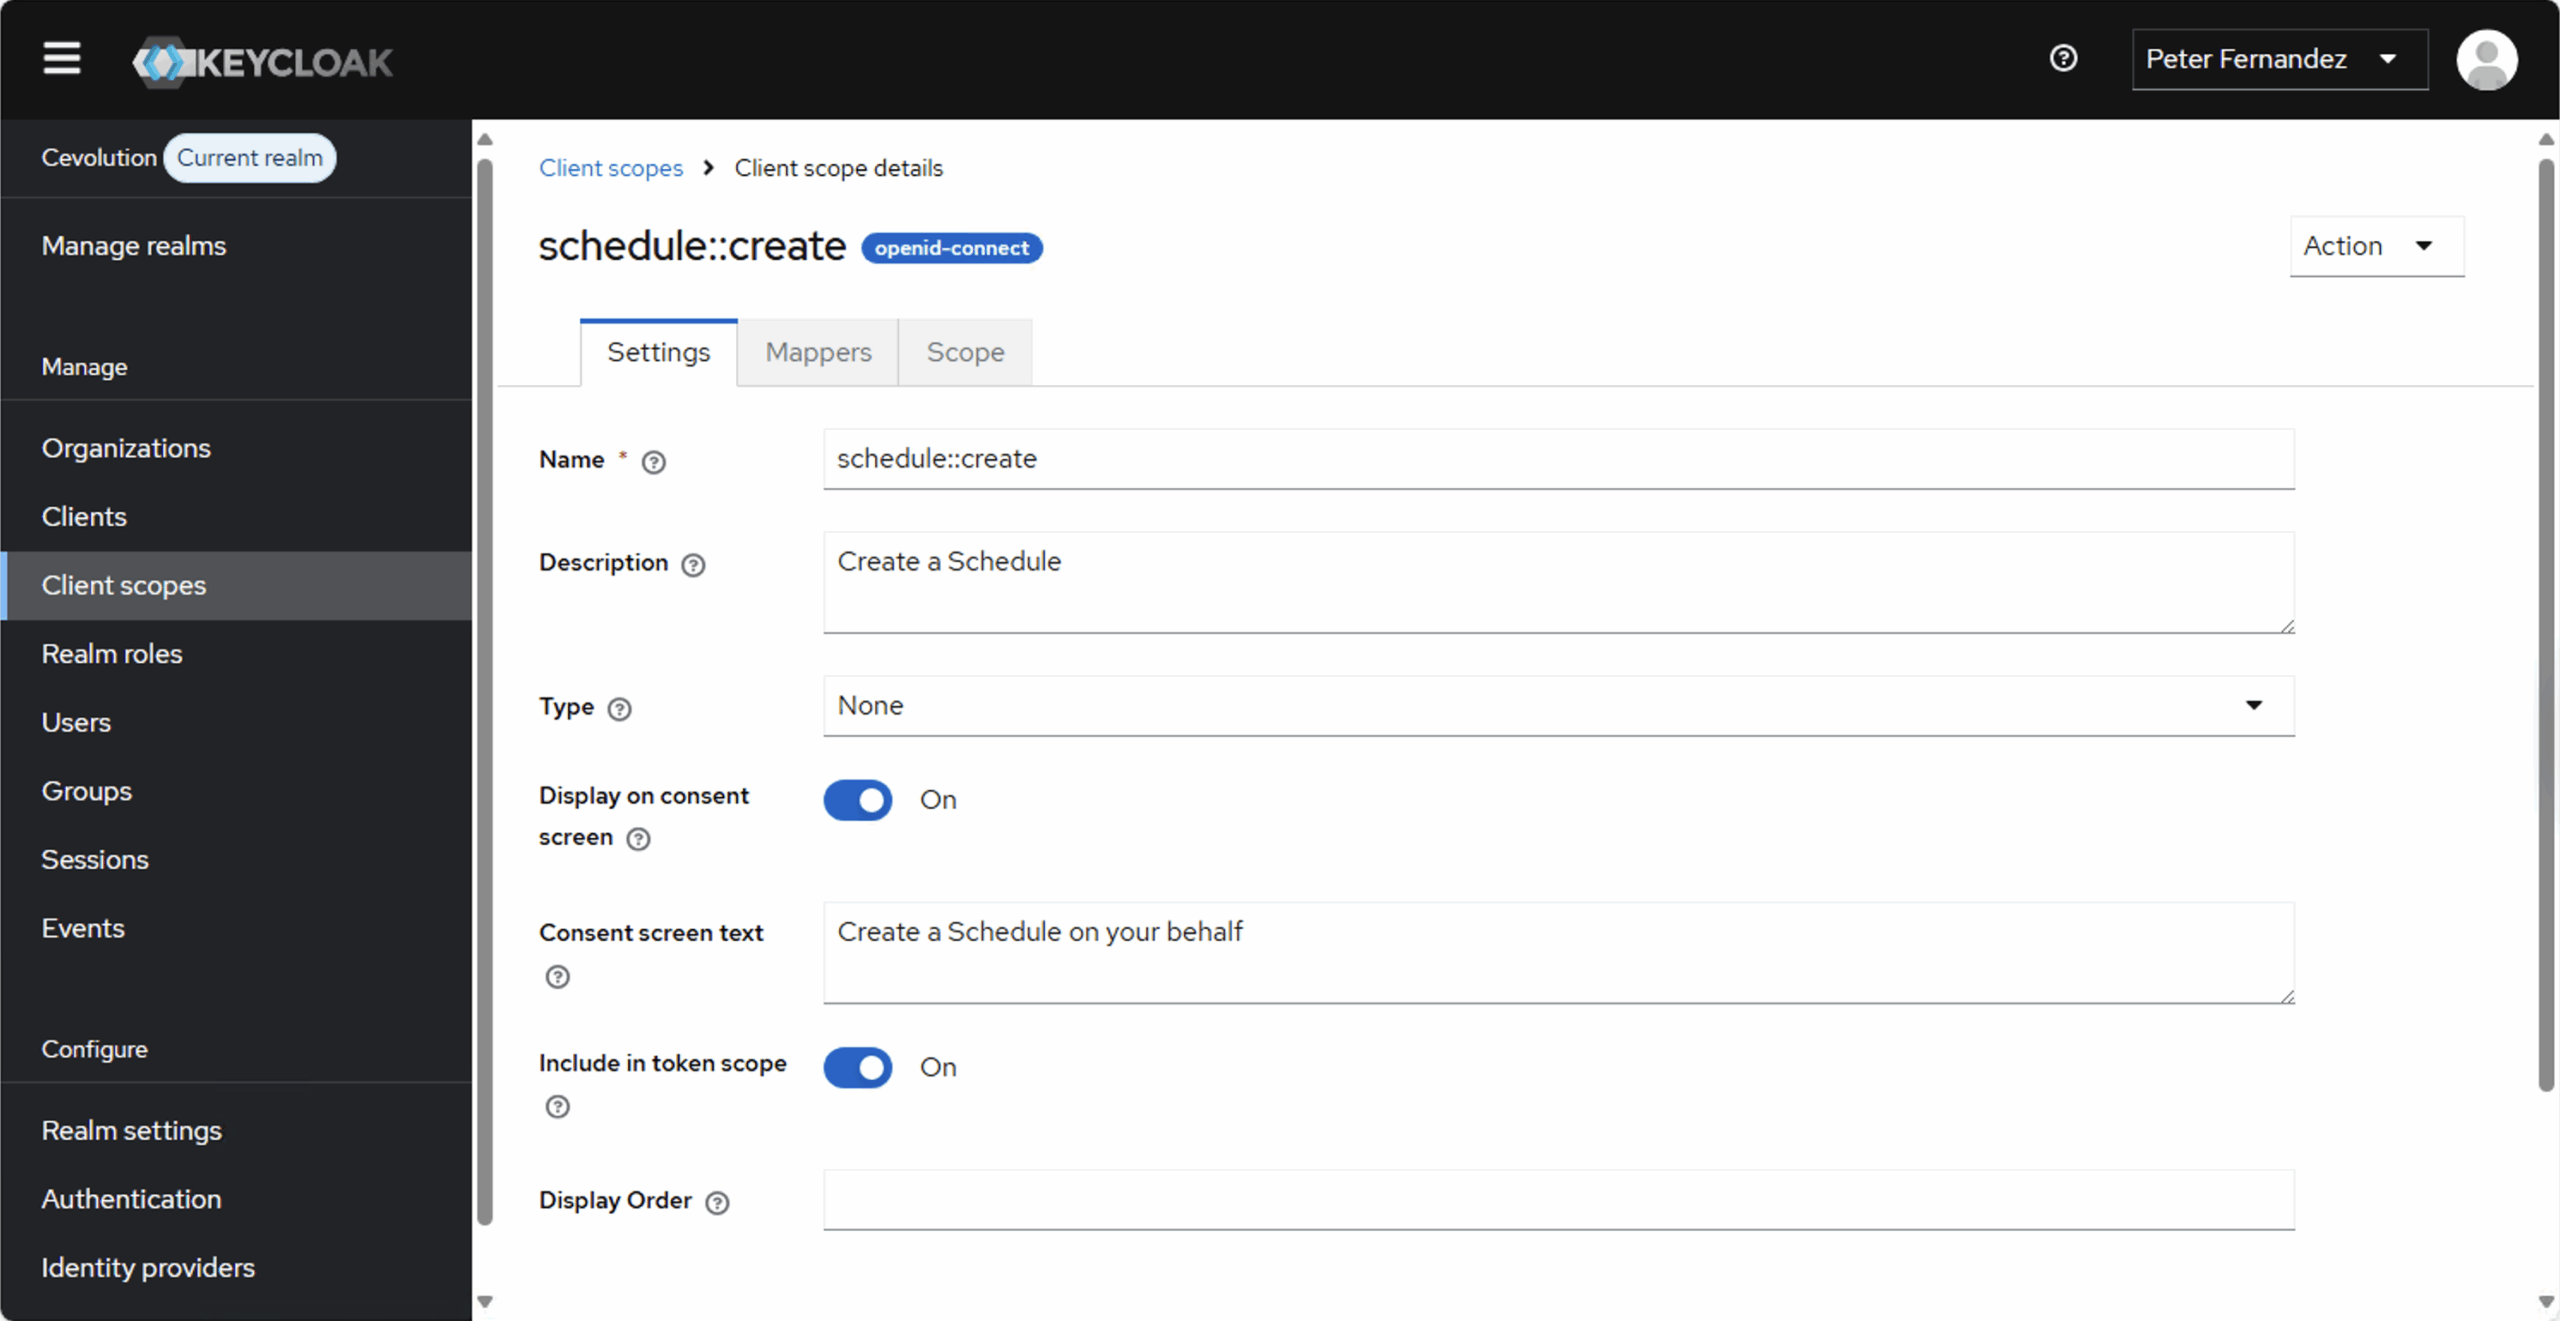
I’m using Keycloak, so the images below illustrate the scope definitions I’ve created for my Schedule API. OAuth 2.0 is a Delegated Authorization protocol, so ordinarily there’s no provision for whether or not a sub — i.e. a user — is allowed to do something or not.
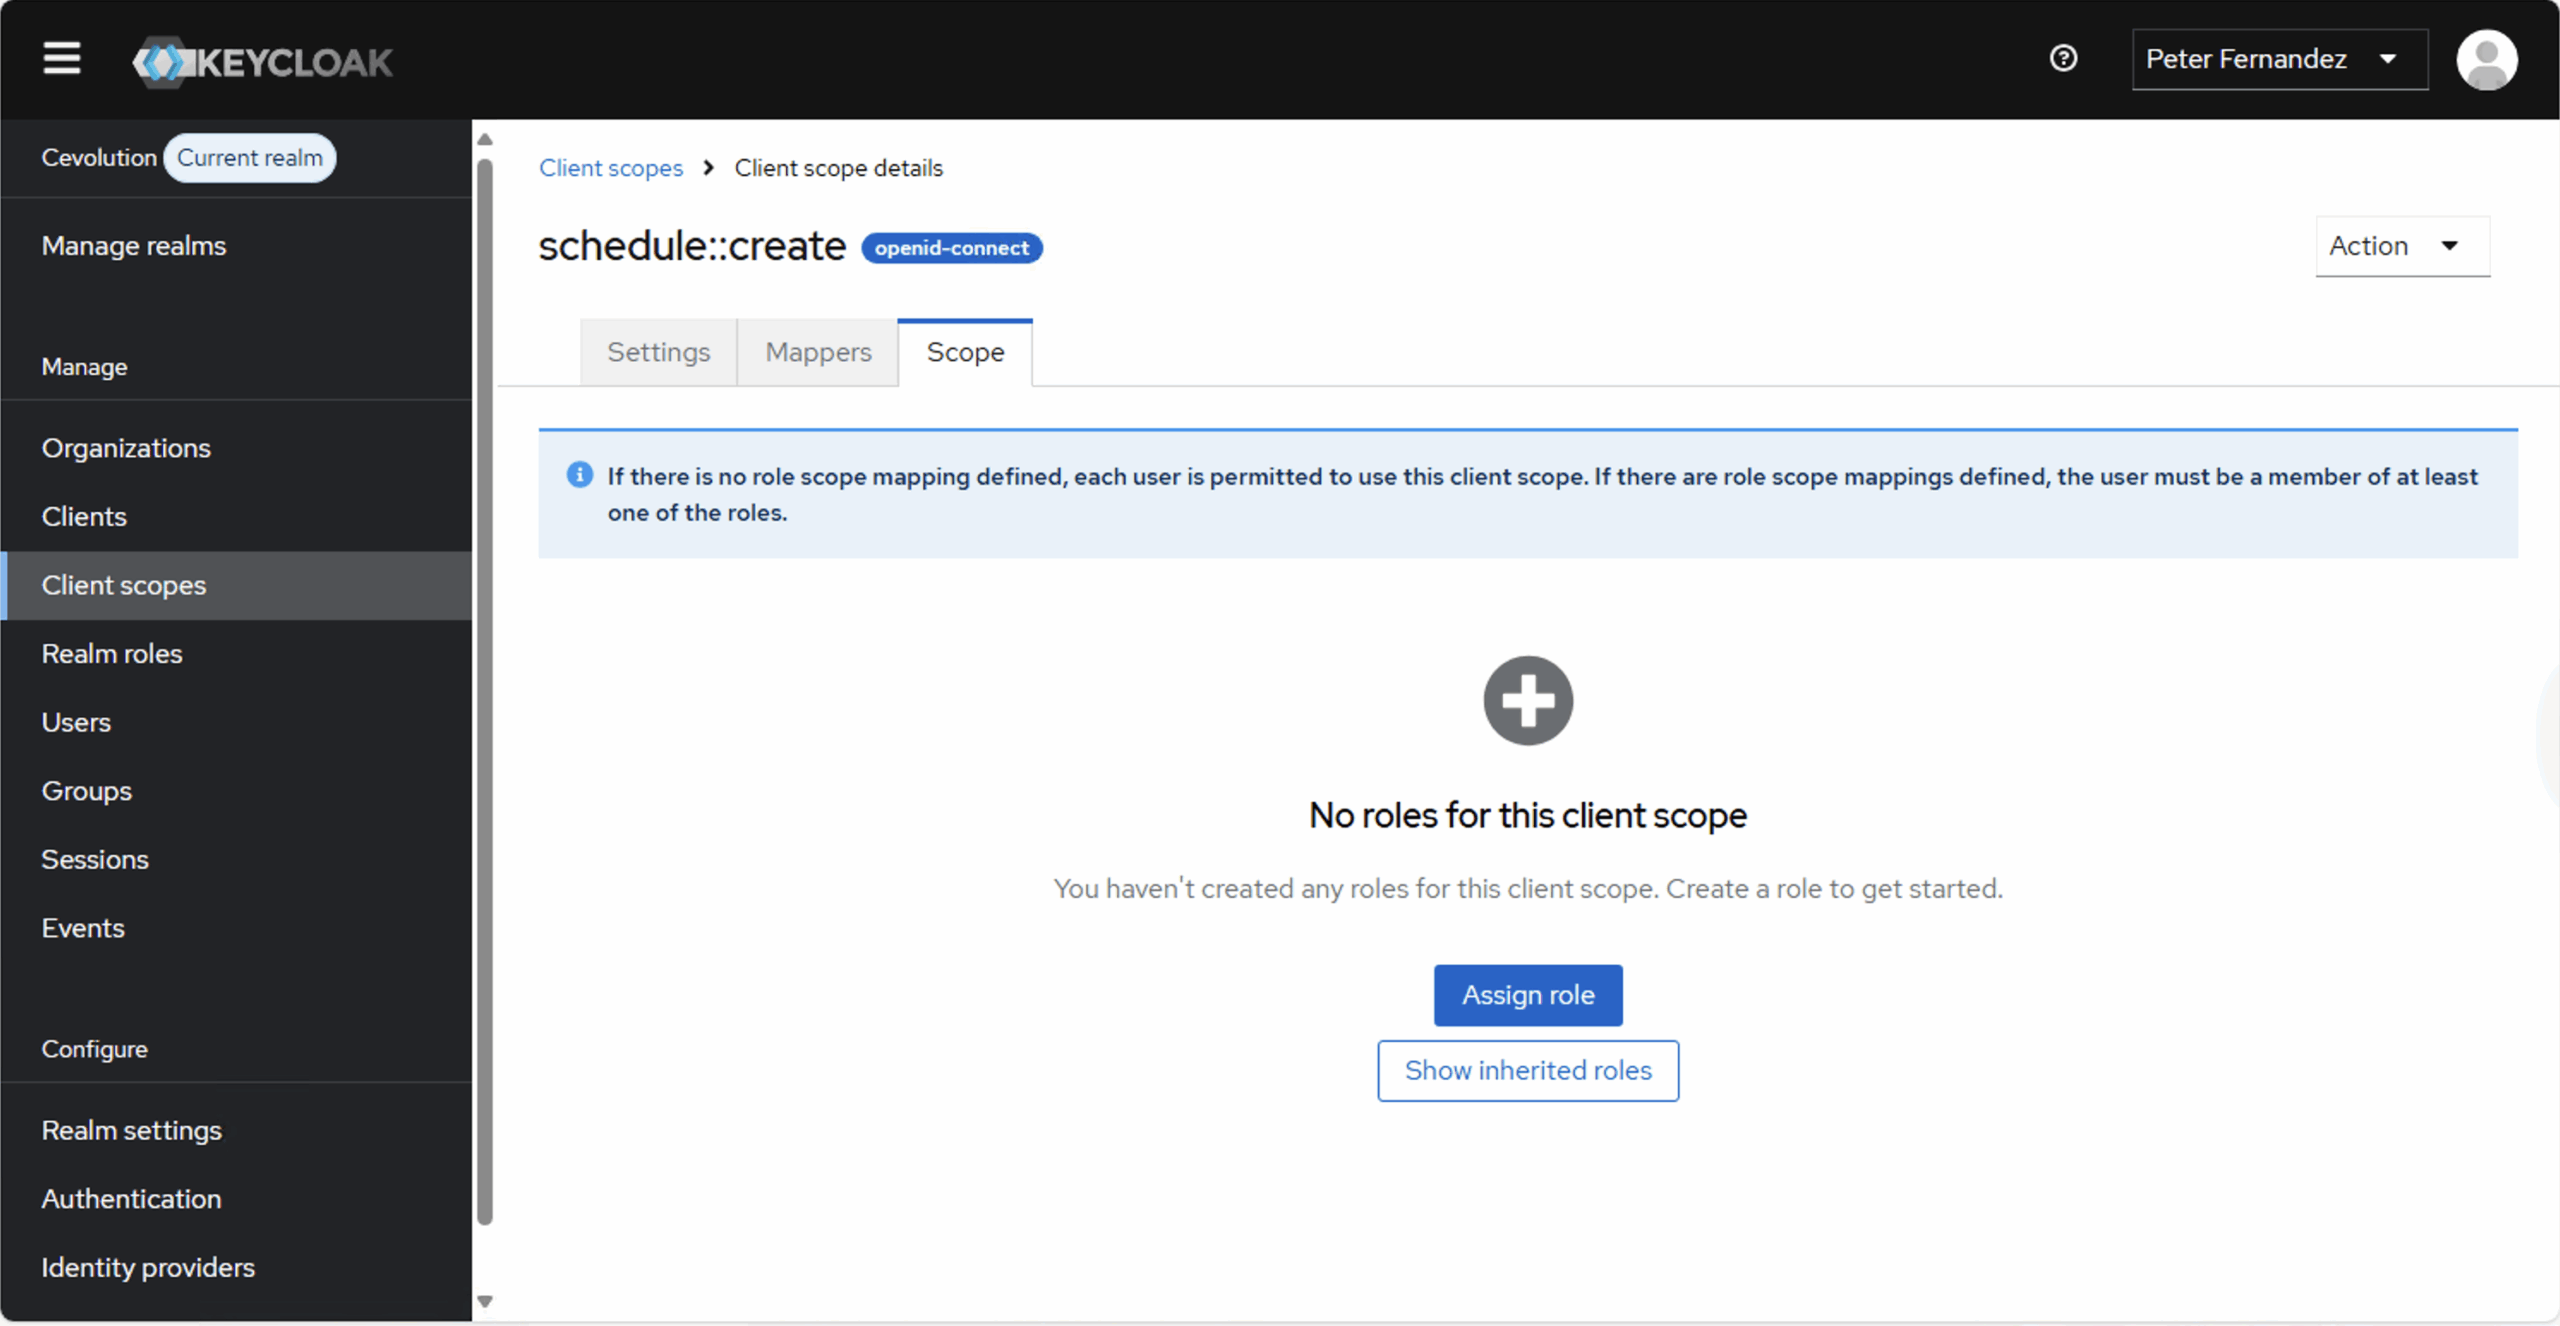
However, access control from an RBAC perspective is often layered on top, especially where JWT format Access Tokens are used, and the last screenshot shows how this can be defined when using Keycloak.
Of course, an Access Token is also typically used as part of querying other access control services (such as ReBAC and the like), so it will often participate indirectly in the access control decision-making process. I’ll be exploring more on that in the future 😁
By default, no audience is associated with a defined Client Scope in Keycloak, so nothing is added to the aud claim in the Access Token per se. Like I say, it’s not specifically something defined as part of the OAuth 2.0 specification.
However, as a best practice, I would recommend having a specific aud claim as well as specific scope claims as part of an Access Token (at least a JWT format Access Token), as it’s an additional attribute that can be leveraged from a security perspective.
There are a number of ways to add an audience to a Client Scope definition in Keycloak, but the simplest way for now is to use the Audience mapper to attach one explicitly; below is a screenshot of how I’ve done just that:
Keycloak gives you a lot of flexibility when it comes to adding things to an Access Token. The Audience mapper, for example, can be configured so that the claim is added directly to the JWT, or only made available via token introspection, should payload size be a consideration, or if the JWT format is not being used.

Last but not least, you need to associate the various (Client) scopes with the appropriate Clients. Below is a screenshot of the nextjs-app definition I have in Keycloak to which I’ve associated the scope definitions created above; I’ve filtered based on scope name so that it’s easier to see these various definitions and so that they don’t get lost among all the other scopes defined to the client.
I’ve also defined each scope as Optional so that it won’t be included by default (as in it will only be included if explicitly requested).

Security Considerations
Resource functionality typically carries with it a certain “weight” from a security perspective. For example, whilst being able to read the current total in a bank account might not be desirable, it’s arguable not as dangerous as being able to transfer funds or withdraw large amounts!
Likewise, being able to read entries from an existing schedule might not be considered as security sensitive as being able to delete or amend existing scheduled events. So the nature of an Access Token often helps define in what context it should be used.
While first-party apps are arguably more trusted, security is always a paramount consideration. Front-end implementation typically executes in what is referred to as a public client context — i.e. execution in a context which is in the public domain, as in it cannot be easily restricted by both physical and digital access controls.
Back-end implementation, on the other hand, is almost always considered to execute in what is referred to as a confidential client context — namely, a context where certain aspects can be tightly restricted via both a physical and a digital set of access controls.
Even if you’re building a SPA as part of your SaaS solution, you can still benefit from back-end workflows by utilising the Backend-For-Frontend (typically referred to as BFF for short) pattern.
From a security perspective, there are always a number of things to consider. I have the option of restricting the visibility of an Access Token so that it’s only ever “seen” from the perspective of back-end usage and never makes its way to the front-end. I also have the option of making an Access Token that carries update or delete scopes, shorter-lived than one that carries create scope, say, with both being shorter-lived than one that carries read scope.
For an Access Token expressed as a JWT, this reduces the security impact if a token falls into the hands of a bad actor. Additionally, I might want to leverage token introspection within more sensitive API routes, where an API will additionally defer to the Authorization Server (i.e. Keycloak) to determine if a token has been revoked.
Here are a few more things to note:
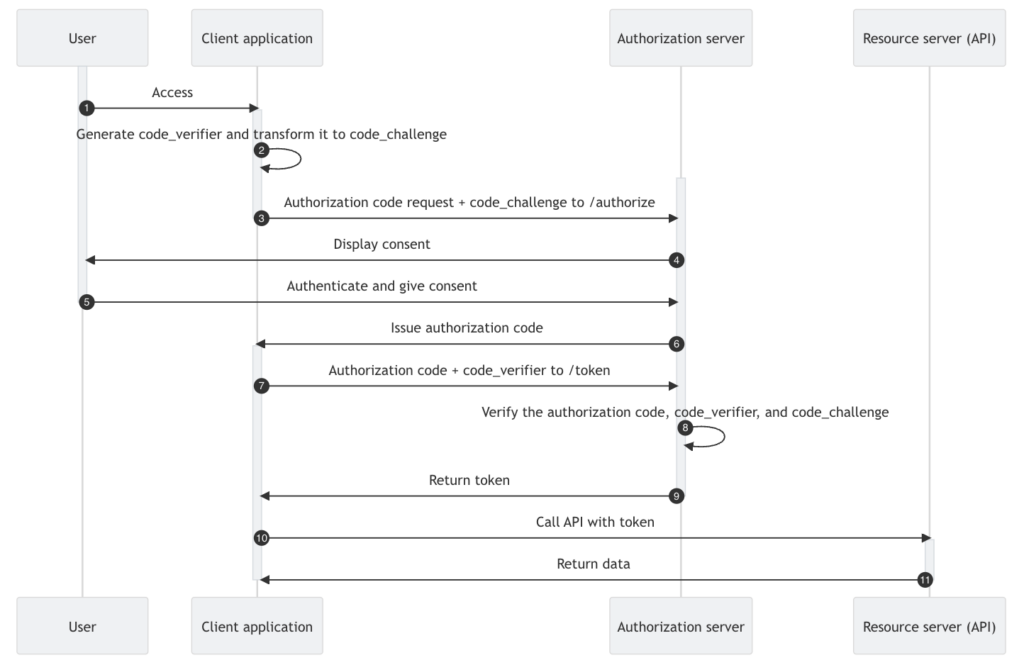
- Use Authorization Code with PKCE: avoid legacy flows like the Implicit Grant or Resource Owner Password Credentials, and always choose Authorization Code Flow — ideally with PKCE — when it comes to user-oriented auth flows.
- Never use Client Secret workflow in anything other than a Confidential Client context
- Secure Token Storage: use
httpOnlycookies or secure session storage for web-based applications, and prefer to use native keychains or encrypted storage for mobile apps and the like. - Avoid transferring an Access Token between client contexts: a token intended for back-end client execution should not be transferred for use by a front-end execution context, and vice versa.
- Always validate an Access Token in the API: including
scopechecking, as well asaudchecking for the most secure experience. - Token Expiry and Refresh: use short-lived Access Tokens and utilise Refresh Tokens (more on those in a future article) to maintain a balanced security posture.
- Revocation and Logout: support token revocation and propagate logout across app sessions — again, more on those in future articles.
- TLS Everywhere: In a production environment, all communication between Clients, IdP’s, an Authorization Server, APIs, etc. should always be conducted over HTTPS.
Maintenability
To date, my experience with Vibe Coding has taught me that you will likely get some duplication, especially where full-context visibility isn’t apparent (such as across AI chat sessions and the like). This isn’t unlike the situation that can arise where more than one developer works on the same piece of code…particularly when they’re not doing so concurrently, and where there is unfamiliarity with the code base.
All of these situations create maintainability issues going forward, and so to minimise technical debt, it’s often worth going back over Vibe-generated code periodically to address inconsistencies.
For example, you can see in the screenshots below how the Vibe-coded additions to the Vibe-coded POST calls use both the internally Vibe-coded withAuth and the externally Vibe-coded verifyAccessToken — the latter of which essentially does the same as the former, thus duplicating functionality.

POST using both…
withAuth…
verifyAccessTokenThe best way to address this is to refactor the code so that only one function is used; as a seasoned developer, I’d opt for keeping the externally created token.ts as it also provides flexibility to add additional functionality without disruption (in this case, additional createRemoteJWKSSet caching, for example, could be added to reduce execution per interaction).
I’d also refactor to relocate token.ts, because it’s not just specific to the schedule API route. I’ve done some “human” rework, and you can find those as part of the GitHub repo I’ve created; you may like to tackle some refactoring of your own for additional maintainability 😁
Testing is something that’s also important for maintainability, especially as the code base grows, and I’ll be looking at opportunities for Vibe coded testing from a CIAM perspective in a future article 🤗
Followup Exercises
If you’re following along in the accompanying video, then you can see the final outcome — as well as everything else discussed here — in action. In my previous article, Vibe Coding Authentication via Authorization Code Flow, I also left you with a few follow up exercises, and you can check out the GitHub repo here to compare with my solutions and see how you got on 😎
Of course, it wouldn’t be the same if I didn’t leave you with a few more follow-up exercises for you to consider and “get your teeth into”, at your leisure — once again, ideally working with Copilot (or your preferred AI of choice) collaboratively to try and solve the challenges:
- Secure Schedule Update via
PUT. Vibe code update to a schedule in a similar fashion to the way implementation for create processing was vibe coded. Remember, this is arguably another of the more security-sensitive operations, so think about ways to minimise potential security impact. - Implement Schedule
DELETE. This API route was, for some reason, completely left out of the code generated by the AI 🤷🏻♂️ I’d be interested in hearing your thoughts on why that might have been, and also interested to see what you come up with as a vibe-coded solution. Again, this is arguably another of the more security-sensitive operations, so consider ways to minimise potential security impact. - Add a menu to switch between pages. I mean, a menu makes it so much easier to navigate around, right? 😉 It’ll be fun to see what sort of menu you can come up with based on your vibe-coding prompt to the AI 😎
- Create a consistent experience when not authenticated. Going back to some of the considerations I touched upon in maintainability (above), I’ve also noticed that there isn’t a consistent UX for what transpires when a user is not already logged in and navigates to a protected page. Depending on the path taken, the user can be presented with a message prompting them to log in, all the way to actually being presented with a login prompt. It would be nice if this were a consistent experience, and I’ll be interested to see what you come up with 🤗


Leave a Reply