
Depending on your perspective, deployment is where a vendor-hosted SaaS CIAM solution can pay dividends, as the third-party vendor will manage the hosting for you. However, as discussed in a previous article I wrote, building a SaaS application — particularly a B2B one — will likely mean you already have the necessary infrastructure (which you already have to manage), and so can leverage this to deploy an open-source CIAM solution.
Keycloak is one such open-source solution that, out of the box, provides the things commonly required of a CIAM integration. Arguably, it’s one of the most well-known and configurable of the open-source solutions, and being open-source means it can easily be tailored to requirements…leveraging one’s own software development skills where needed:
- Single Sign-On (SSO)
- Multi-factor authentication (MFA)
- Access control (specifically RBAC)
- Social login support (e.g., Google, Facebook)
- Account Linking (read more about that here)
- Self-Service Account Management,
- Delegated Authorization
- Enterprise Federation
- Brand Management
- etc.
Whilst Keycloak isn’t particularly difficult to install, it’s fair to say that some work is required to get it into a production-ready state (read more in the official Configuring Keycloak for Production guide). It’s not a huge amount, especially if you already have similar considerations for deploying your consumer-oriented B2C/B2B SaaS application, but it’s work nonetheless.
My name’s Peter Fernandez, and in this article, I’m going to talk about my own DIY experience using open-source Keycloak as a tool-oriented CIAM option that comes at a fraction of the cost of a vendor-hosted SaaS CIAM solution.
Throughout the rest of this article, I’ll be dipping in and out of the various guides at https://www.keycloak.org/guides, so whilst I don’t necessarily advocate reading them all, I’d recommend at least familiarising yourself with that resource before continuing 😎
Containerized Deployment
For evaluation/prototyping, arguably the easiest way to deploy Keycloak, if you don’t already have it installed, is via the Container Image. Of course, you’ll need a container management platform installed and configured, too, and my preferred choice is typically to use Docker.
Docker is a Platform-as-a-Service (PaaS) product that uses OS-level virtualisation to deploy software using containers. I often use the Docker Desktop free tier, which can be downloaded here.
The article here provides more details as part of the latest official Keycloak documentation, but for convenience, once the container is downloaded to Docker, the following command should get it up and running in a local development environment:
docker run -p 8080:8080 -e KC_BOOTSTRAP_ADMIN_USERNAME=admin -e KC_BOOTSTRAP_ADMIN_PASSWORD=password quay.io/keycloak/keycloak:26.1.0 start-devA Docker container can be used for production deployment, too; however, you can also download a non-containerised package should you choose. Keycloak is a Java-based service, with the latest version being powered using Quarkus, so either option should perform well enough.
As a general “rule of thumb”, I like to take the simplest approach to deployment in the first instance, so using a containerised setup is a good option for getting something up and running before tackling anything more complicated 😁
Primarily an Enterprise-Grade IAM Managed Solution provider for Keycloak, the folks over at Phase 2 also offer a free Starter plan if you’d prefer skipping the deployment of your own instance to start with. Alternatively, the folks over at Keycloakit offer a ready-made install for a low one-time cost with no subscription fee.
Bare Metal Deployment
If you decide to take the non-containerised route — the route typically referred to as the bare metal or OpenJDK option — then the Keycloak documentation here provides a lot of details to help you get going. Again, if you don’t already have Keycloak installed, the latest package can be downloaded here.
Depending on your point of view, the bare metal option arguably gives you the most flexibility, but it all depends on your preference and also the existing environment in which you plan to deploy.
I’m opting for the bare metal approach because I (a) want to familiarise myself with the various aspects of setting up a Keycloak environment, and (b) will ultimately want to experiment and customise, using things like Apache for proxying, etc. (see more below).
Keycloak runs on either Windows, Mac or Linux, and I’m deploying to AWS Lightsail, using what is effectively a LAMP stack templated by Bitnami. At a reasonable $12 per month hosting charge (for 2GB Memory, 2 vCPUs, 60GB of SSD and where the first 90 days of usage are typically free for new customers), this represents amazing value — at least for getting started!
Once installed, by default, Keycloak can be simply executed from a command shell, typically taking a number of different configuration options as parameters. Primarily, this is the easiest way to test out a bare metal installation, and all the snippets I’ve included in this article are based on taking that approach.
You can also use start-dev rather than start, and doing so enables some developer options by default…like disabling optimisations. You often find that you need to set environment variables as well as specify Keycloak parameters, so a quick way to do this from the command line is just to execute from within a separate shell context, e.g. something like:
sudo bash -c 'KC_DB="mysql" KC_DB_URL="jdbc:mysql://<address>:3306/keycloak?characterEncoding=UTF-8" KC_DB_USERNAME="keycloak" KC_DB_PASSWORD="<password>" /opt/keycloak/bin/kc.sh start --hostname=<hostname> --https-certificate-file=/opt/bitnami/apache/conf/bitnami/certs/server.crt --https-certificate-key-file=/opt/bitnami/apache/conf/bitnami/certs/server.key'I’ve installed into /opt/keycloak, so feel free to replace with whichever location you’ve installed your Keycloak deployment.
Turnkey Solution
At some point, however, you’ll want to create a turnkey solution so that you can ensure Keycloak is always operational, particularly on reboot of the host environment, etc. Whilst it might seem like I’m “skipping ahead” a bit, I’m going to cover this now…which also saves time for those who just want to cut to the chase 😉
Turnkey essentially means ready to use, often implying a complete, pre-packaged solution that requires minimal additional effort to operate.
As mentioned, I’m installing Keycloak as part of a LAMP deployment, using Apache Web Server, and hosted on AWS Lightsail, configured by a stack template supplied by Bitnami.
I’ve added some additional bits for my specific use case scenario — like WordPress Multisite (see the Bitnami docs here for more details), that’s not required to host Keycloak — however, the setup is basically a Debian Linux distro, and so I’ll focus on how I set up a turnkey solution for that; your hosting may differ, but if it’s a Linux-based one, then most of what I share should still work.
systemd
As described in detail in the Digital Ocean article here (a fantastic primer on the topic) one of the most widely adopted mechanisms for Linux system management is systemd, with the systemctl command being the central tool for controlling it.
Systemd is essentially a software suite (providing tools related to services, mounting points, and more) that manages Linux by acting as a system and service manager, and is the default init system option for many major Linux distributions.
Using systemd and the systemctl command, it’s a relatively straightforward process to set up Keycloak-managed system initialisation, and when using systemd (which is typically run as a root service), the first thing to do is create the unit file. In this case, a keycloak.service unit file. Using the nano editor, this would be something like:
sudo nano /etc/systemd/system/keycloak.serviceIn the editor (and where editing can also be achieved using the systemctl edit keycloak command), the next thing to do is add/modify the relevant directives (documented here) that control the service definition. In my case, where I’m deploying to a system configured by the stack template supplied by Bitnami, and also using MySQL (more below), this looks similar to the following:
Changes made to an existing .service file may require a reload, which can typically be achieved using the sudo systemctl daemon-reload command.
[Unit]
Description=Keycloak
After=syslog.target network.target

# Hint: If Keycloak must be started before other services,
# specify it like this:
Before=bitnami.service

[Service]
LimitNOFILE=102642
Environment="KC_DB=mysql"
Environment="KC_DB_URL=jdbc:mysql://<address:3306|port>/<schema>?characterEncoding=UTF-8"
Environment="KC_DB_USERNAME=<DB user name>"
Environment="KC_DB_PASSWORD=<DB password>"
ExecStart=/opt/keycloak/bin/kc.sh start --hostname=auth.cevolution.co.uk --http-max-queued-requests=<max request threshold> --https-certificate-file=/opt/bitnami/apache/conf/bitnami/certs/server.crt --https-certificate-key-file=/opt/bitnami/apache/conf/bitnami/certs/server.key --proxy-headers xforwarded

[Install]
WantedBy=multi-user.target
I’m using a MySQL instance hosted externally — an important consideration for the work I’m currently doing — however, an AWS Lightsail instance templated by Bitnami typically comes with a MariaDB deployment that’s perfectly adequate. In fact, a localised DB deployment can be beneficial to a load-balanced, fault-tolerant, geographically distributed production system; however, all of that is a story for another time.
systemctl Commands
I can now use the various systemctl commands to interact with the service, like getting status information and/or restarting the service independently using the start and stop commands.
The system enable command is particularly relevant, and you’ll want to run this at least once to enable the Keycloak service automatic start on boot; systemd automatically takes care of the start order based on the definitions in the service unit file (above).
sudo systemctl status keycloak
sudo systemctl start keycloak
sudo systemctl stop keycloak
sudo systemctl enable keycloak
Data Storage
Whichever deployment route you choose, out-of-the-box Keycloak lets you get up and running with a data storage facility that utilises the local filesystem — great for minimal evaluation/prototyping, but not particularly manageable or scalable.
Anything you set up under a basic out-of-box configuration will typically be lost when you change data storage, so it’s probably best not to do a huge amount without first configuring to use a database (even during prototype/evaluation).
Ultimately, in a production environment, you’ll want to leverage a database, which also allows for Keycloak service distribution — i.e. the setup of multiple Keycloak servers for load/geographical balance. You can read more in the official Configuring Keycloak for Production guide.
I’ve opted for the database route from the start because I want to be able to stand up both a development and a production instance of the Keycloak server, and I’ll also want to be able to use tools that help me investigate the data being generated/consumed.
As mentioned, I’m using a MySQL service and MySQL Workbench to help analyse performance, data tables usage, and configuration; a Bitnami templated stack on AWS Lightsail comes with MariaDB, which is equivalent to using MySQL.
MySQL
Whether you’re configuring for MySQL or one of the other supported databases, you’ll want to get familiar with the official Keycloak documentation here. Keycloak is a Java application, and Java Database Connectors tend to follow a particular specification when it comes to configuring connection parameters; for MySQL, I’ve found the documentation here to be really useful 😎
Like me, you’re probably going to end up using an already deployed DBMS instance — in my case, MySQL — and defining a new Schema for Keycloak. If you are, then start by paying particular attention to this section of the documentation to check the suitability of your instance. For me, when creating a MySQL schema, I typically opt for a utf8mb4 charset with utf8mb4_general collation, which provides blanket support for Unicode characters. Your requirements may be different.
Securing access to any database schema is important, but even more so for a database schema being used by a security subsystem. The use of TLS, as well as access restriction based on IP address, is always recommended.
Schema Creation
According to the official MySQL docs, utf8mb4 provides Unicode support using 1-4 characters, and will soon be the default for the utf8 alias (which currently uses the soon-to-be-deprecated utf8mb3). Whilst the Keycloak docs suggest utf8mb4 is not currently supported, as in the full 4 characters are not currently used, I’ve preferred to opt for using the additional storage to prepare for when it is 😎
If anyone knows any reason why my choice of using utf8mb4 might not be a good one — other than potentially consuming more storage space — please feel free to let me know 🤗
Temporary Admin Account
Whichever data storage route you choose, you’ll typically need to start by creating the temporary administrative user. This is the user who’ll be initially responsible for managing the whole Keycloak installation, and you will be encouraged to change it once you have established initial access (see below for more details).
If you’re installing in an interactive environment which also has Browser capability, then navigating to the admin console (described below) via localhost will allow the creation of the temporary admin user. However, if, like me, you’re installing into an environment that has no (or limited) interactive Browser capability, then I’d recommend using the dedicated bootstrap-admin command as discussed in the official Keycloak documentation here, and which goes something like:
/opt/keycloak/bin/kc.sh start --bootstrap-admin-username admin --bootstrap-admin-password passwordKeycloak also supports the use of a service account as the temporary administrator, but I haven’t tried that, so I won’t comment on it more here. The official Keycloak docs, though, provide further details.
Security
Security should be a paramount consideration for any deployed SaaS solution, and for security-related components, the importance is even greater: if you’re going to take an open-source DIY (Deploy It Yourself) approach to CIAM, the last thing you want is to have a system vulnerable to attack!
AWS Lightsail deployments templated by Bitnami are already hardened from an OS/Network perspective, and, in my case, the WordPress template has some additional attention. I’ll be talking more about hardening from a security perspective in future articles, but for now, here are some of the basic things that will make your Keycloak installation secure.
Permanent Admin Account
The temporary admin account generated by Keycloak is just that — i.e. temporary — and should be changed as part of the configuration process. Actually, “change” is not the correct term, as Keycloak doesn’t really allow you to “change” an admin user per se.
Once connected to the admin console (see below for details), the first thing Keycloak will remind you to do is to replace the temporary admin account you previously created (see above).
From a security perspective, using a name other than admin or administrator is always preferable, and, of course, a suitably obscure password makes life difficult for a would-be hacker!
As you’ll see in the section below, using a proxy to cloak admin console access makes things even more secure.
TLS
No SaaS security-related system should be run without some level of transport encryption: HTTP traffic is typically routed via the internet, which means potential interception by any third party. Fortunately, when using the HTTP protocol, it’s relatively easy to do this by using TLS (a.k.a. HTTPS), enabled by an appropriate certificate.
Keycloak can be easily configured to use TLS as described in the official documentation here, which includes details of leveraging a system keystore as an option, too. However, below you’ll find an easy-to-use example — replacing the --hostname value with one compatible with the certificate you’re using. Remember, this is based on simple command line usage, whereas my solution to a fully configured turnkey approach, above, has everything combined.
/opt/keycloak/bin/kc.sh start --hostname=auth.cevolution.co.uk --https-certificate-file=/opt/bitnami/apache/conf/bitnami/certs/server.crt --https-certificate-key-file=/opt/bitnami/apache/conf/bitnami/certs/server.keyIf you’re planning to use a reverse proxy — see the next section for more details — you can potentially skip TLS if you’re going to terminate SSL at the proxy; encryption is computationally intensive, so there’s no need to do it needlessly. However, there are many things to consider from a security perspective if you do opt for that approach, which are beyond the scope of this article.
Reverse Proxy
Setting up a reverse proxy for Keycloak is a really good option for hardening security and paving the way for scalability if it comes to the point you need it. For instance, using a proxy will allow you to restrict Keycloak administration (discussed later) to a limited set of clients, whilst opening up the other routes to the internet. This is described in more detail in the official Keycloak documentation here, so the first thing to probably do is take a look at that.
As mentioned previously, I’m using Apache Web Server as part of an installation on AWS Lightsail, powered by a stack template supplied by Bitnami, and this is specific to my use case scenario.
It’s certainly not a requirement to proxy Keycloak, and you may not even be using Apache. However, setting up a proxy will provide benefits long term — paving the way for scalability, for example, as I say — and if you do decide to use Apache, the documentation here (supplied by Digital Ocean) provides a really good primer on setting up and enabling it as a general reverse proxy for HTTP et al.
Bitnami provide a number of different stacks for AWS — and other hosting platforms for that matter — and my setup already came with mod_proxy and its associated components (e.g. mod_proxy_http), all of which you will need for proxing via Apache, enabled by default.
Once you’ve enabled proxy capability on whatever web server you’re using, you’ll need to configure it. As I say, I’m using Apache, so the configuration I’m going to describe is for that, and I’ll be doing so within the context of the setup provided by Bitnami (though it should be easy to work out what you need to do for your situation; Apache — or an equivalent web server — is the only thing you really need).
Start by configuring a vhost for Keycloak, using something like the following example; this will provide Apache with the proxy definitions it requires, and in my configuration, I called it something like keycloak-https-vhost.conf (TLS being the best practice recommendation, as described above).
<VirtualHost _default_:443>
  ServerName <hostname>

  SSLEngine on
  SSLCertificateFile "/opt/bitnami/apache/conf/bitnami/certs/server.crt"
  SSLCertificateKeyFile "/opt/bitnami/apache/conf/bitnami/certs/server.key"
  SSLProxyEngine On
  SSLProxyCheckPeerExpire Off
  SSLProxyCheckPeerName Off
  SSLProxyCheckPeerCN Off

  ProxyPass /resources https://localhost:8443/resources/
  ProxyPassReverse /resources https://localhost:8443/resources/

  ProxyPass /realms https://localhost:8443/realms/
  ProxyPassReverse /realms https://localhost:8443/realms/

  ErrorLog logs/error_keycloak.log
  CustomLog logs/access_keycloak.log common
</VirtualHost>
I specified additional ErrorLog and CustomLog definitions so that I could keep Keycloak proxy logging separate from everything else (Apache, in my case, also being used to support WordPress).
The various SSLProxyCheck settings were also required to bypass peer context checking, given that I’m using a localhost target reference: for me, both Keycloak and Apache are on the same machine, and I’m not doing SSL termination at the proxy.
Rate Limiting
As described in the official Keycloak documentation, limiting the number of queued requests in a production environment is a recommended best practice, and you should use the http-max-queued-requests option to configure this accordingly to protect your Keycloak installation from overload — i.e. by rejecting requests once a certain threshold is reached.
What that threshold might be will depend on your use case and also your configuration; I’ve opted for a setting of 100 (at least whilst in development). As the Keycloak docs suggest, you should reflect this throughout your Keycloak infrastructure, including tuning whatever load balancing (via proxy) you have in your environment.
Outside of Keycloak specific defintions, proxy configuration and/or your infrastructure provider will likely provide additional rate-limiting mechanisms which you should familiarise yourself with and leverage where appropriate.
Administration
For the newly initiated, administration is largely performed via the Keycloak Admin Console; from a Management perspective, Keycloak provides an Admin API, which also allows operational configuration to be integrated within a CI/CD pipeline or other automation as part of the SDLC, etc., but that’s a story for another time.
At some stage, I’ll no doubt share my own take on the various aspects of the Keycloak Admin Console from a Customer Identity perspective (and you’ll be able to read those articles on the Discover CIAM Blog at some point in the future).
For now, however, the following by @code-215 comes across as being a fairly good introduction, despite it being a few years old now; though I’ll not go much further in this article, there are a few aspects of the Admin Console that are worth paying particular attention to.:
Realm
A realm is a discrete space where you manage objects like clients, users, roles, etc. Creating a new realm is relatively straightforward and is probably the first thing you’ll want to do from the Admin Console. If you are already familiar with a CIAM solution like Auth0, then a Realm is analogous to a Tenant (at least in the Auth0 case).
Realm Isolation
Many folks go overboard when it comes to creating realms, and probably the best advice I can share here is to use them sparingly. Realms are isolating constructs, so sharing the likes of client definitions, users, or roles across them is restricted. Ergo, prefer to use a new Realm only when hard isolation is required, e.g:
- Environmental separation: i.e. for development, staging, and production to test changes in isolation.
- Functional separation: i.e. in large (corporate) enterprises that may be developing discrete internal B2C style applications for different departments or business units.
Having said that, I would always recommend that you create at least one realm in addition to the master realm that comes supplied out of the box. You’re going to want to do this because you’ll want to keep your B2C/B2B SaaS user definitions separate from those users who can administer Keycloak (even if they might also be users/administrators of your SaaS application).
Prior to v26, the Keycloak Realm metaphor was often used to model multitenancy in B2B SaaS applications. Since Keycloak v26, however, this is now modelled natively using the Organizations feature (discussed below)
Client
As per RFC 6749 — the OAuth 2.0 specification — a client represents an application that uses Keycloak. To be more precise, I take the perspective of a client representing an aspect of an application that utilises OAuth 2.0 (and/or OIDC), and in the admin console, under the newly created realm, you can create the various clients you need to reflect your SaaS application requirements. I’ll talk more about client definitions in future articles as I show how to integrate with Keycloak 😊
Users
Likewise, for users, the admin console shows the users defined to the realm and allows you to add and/or modify user definitions as required.
For anything other than the master realm, users are typically created via the CIAM interactions of your B2C/B2B SaaS applications; from a management perspective, and in a development context in particular, the admin console provides authorised personnel with an out-of-box interface to manipulate the various aspects of any user definition — especially when it comes to manipulating the specifics associated with a user account.
Organizations
I’m going to cover Keycloak Organizations in detail in a future article; it’s a crucial feature if you’re developing a B2B SaaS application, and so worthy of a discussion in its own right. In the meantime, the folks over at Inero Software — a consultancy specialising in IAM integrations, amongst other things — have created a short article of their own that’s worth checking out:
Access Restriction
One last thing to cover for now is how using a reverse proxy setup can help provide additional protection to your Keycloak environment. Unlike with most 3rd-party SaaS CIAM solutions, with Keycloak DIY, a proxy can be used to completely cloak access to the admin console — and also the Keycloak management API — from anything other than a specific set of IP addresses (i.e. typically those behind your firewall). This really does limit the potential for malicious attack.
In my case, for example, I have Keycloak running on port 8443 and have restricted public internet access to all routes except /realms and /resources (as described in the section above). I’ve then opened up port 8443 at the infrastructure level — in my case, AWS Lightsail — to only a handful of IP addresses, in a process commonly referred to as IP Allowlisting.
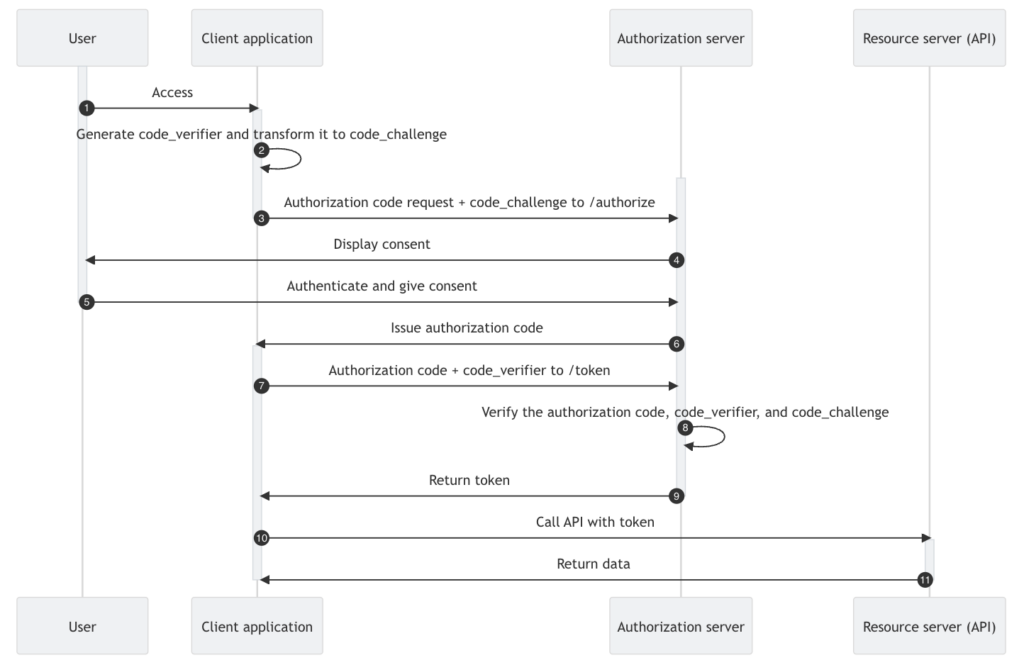
Integration
I recently shared an article on my experience with Vibe Coding, which, for those not familiar, is an AI-dependent programming technique where you can describe a problem in a few sentences as a prompt to a large language model (LLM) tuned for coding. It was a fun CIAM integration experiment, and since then, I’ve been doing more Vibe Coding as part of the work I’m doing on the SaaS applications I’m developing.
My experiment used Keycloak to integrate CIAM Authentication into a simple Next.js application, so for now, I will sign off by providing a link to that article; be sure to watch out for more articles in a similar vein very soon 😎


Leave a Reply