
Developers often ask the question, “How do I go about integrating CIAM standards like OIDC and OAuth 2.0 into my application?” Invariably, for the majority of use cases, the answer is “Integrate via an application-independent IdP, using Authorization Code Flow (a.k.a. the OAuth 2.0 Authorization Flow grant type)”. But what does that actually mean? What is Authorization Code Flow, and how do you go about integrating it into your code?
Other flows — as in other grant types — are available, and you can read more about those here. However, using Authorization Code Flow is the recommended best practice for most user interactive situations (i.e. Login).
In a previous article, I talked about architecting a CIAM solution and how a Buy or DIY (Deploy It Yourself) approach is typically preferable to a Build-it-yourself one. My name’s Peter Fernandez, and whichever approach you prefer, in this article — together with its accompanying video — I’m going to talk about using Authorization Code Flow and how to utilise it “a-la Vibe style” when integrating OIDC to provide CIAM Authentication in your B2C or B2B SaaS solution 😎
For B2C and B2B SaaS solutions, the use of Authorization Code Flow is also the recommended best practice when it comes to integrating Delegated Authorization and Access Control, but for now, we’ll just stick with Authentication.
What is Authorization Code Flow?
Authorization Code Flow is the name given to the workflow typically used in both the OIDC protocol (to obtain an ID Token) and in the OAuth 2.0 protocol to obtain an Access Token. Its use is a recommended best practice, at least for web applications and SPAs, and it’s described in more detail in the following article:
It describes a protocol for obtaining an OIDC ID Token and an (optional) OAuth 2.0 Access Token as part of a modern CIAM integration. As such, it’s completely technology agnostic: your application can be written in Python, C#, Java, PHP, Javascript, etc; leverage technology stack frameworks such as Laravel, .NET, Next.js, Django, Spring or React; technology stack scaffolding such as WordPress, Drupal or Shopify and utilize some (vendor-provided) SDK and/or some bespoke implementation.
Authorization Code Flow facilitates Authentication — i.e. Login — and also authorisation in a User context from the perspective of Consent. Both the ID Token and the (optional) Access Token returned can be used to provide user information, informing both the UI and any prospective API.
The diagram below shows how a user would interact with the application, and in turn, how the application will interact with the application-independent IdP/Authorization Server, typically implemented as part of this workflow:
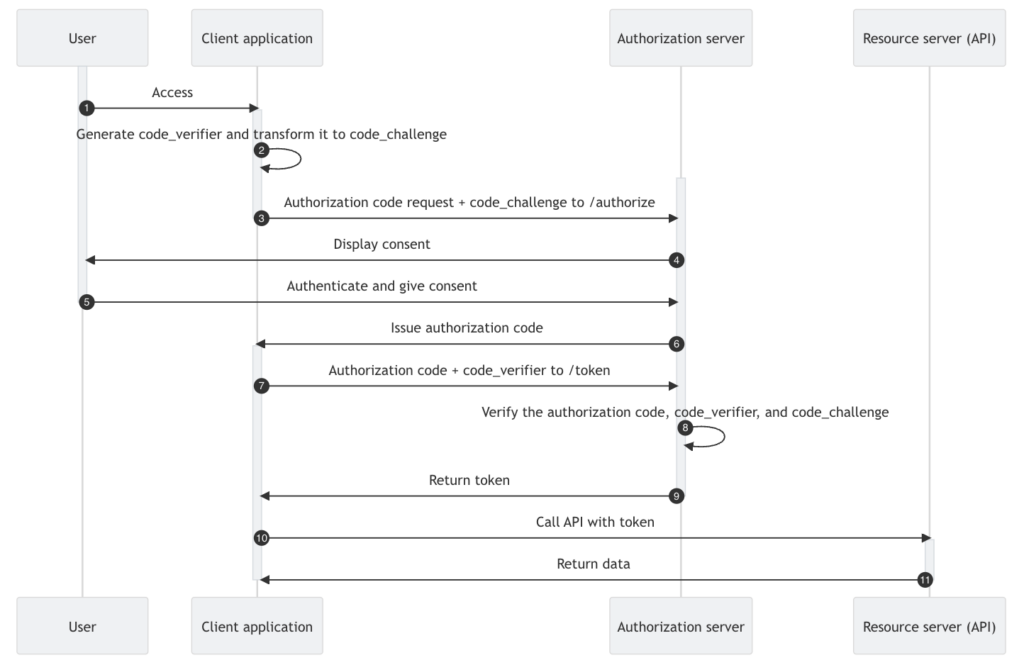
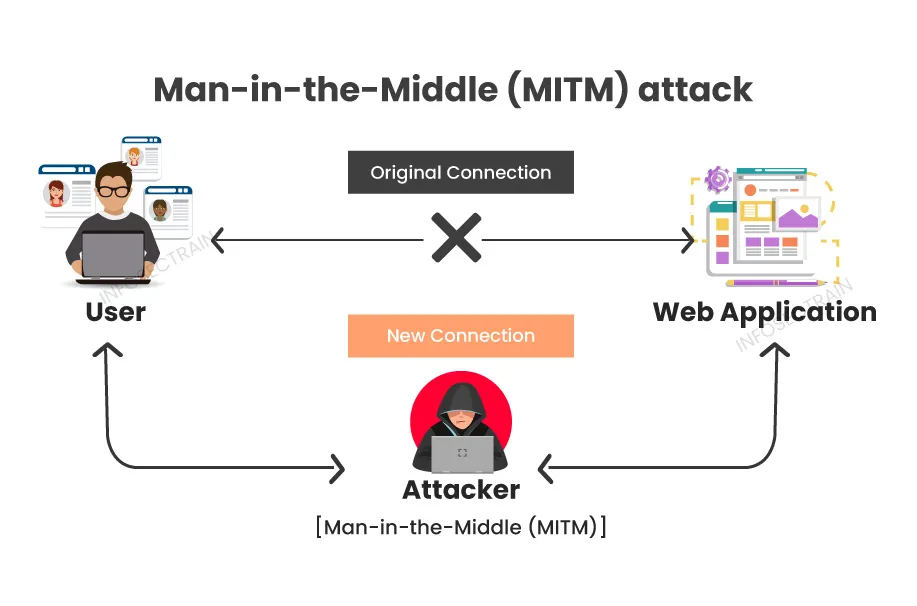
The diagram below illustrates Authorization Code Flow with PKCE, a variation using the best-practice Proof Key for Code Exchange (PKCE) mechanism, mandatory for public clients and recommended generally to mitigate MITM attacks.
What is Vibe Coding?
Vibe coding” refers to a new approach to software development where developers use natural language prompts to interact with large language models (LLMs) to generate code, rather than writing code directly. Essentially, instead of writing lines of code, developers describe the desired functionality, and the AI handles the code generation.
Vibe coding is an AI-dependent programming technique, but there’s nothing to say you have to build all of an application using it. Describing a specific problem in a sentence or two, as a prompt to a large language model (LLM), ideally tuned for coding, is arguably just as valuable.
I recently watched an episode of the live stream that an ex-colleague of mine (Juan) does, and the episode I watched was entitled “Vibe coding an AI app” (below). In the episode, Juan explores building an application using the AI Vibe technique, with varying results, and the various challenges faced are readily apparent.

I’ve not tried Vibe coding before, but my experience with AI has taught me that the more discrete the problem, and the more precise you can be at describing what you’re trying to achieve — arguably easier to do with a discrete situation — the more likely it is that (generative) AI will be able to help. So I thought it would be fun to try vibe coding the integration of just the user authentication piece using OIDC via Authorization Code Flow into a Next.js app.
Next.js has become a popular option for building SaaS applications, and it’s relatively straightforward to get started and get a basic app running in no time at all.
Creating a Next.js App
The first job is to create a simple Next.js application, and this can easily be done using something similar to the command below. You’ll need a compatible version of Node.js installed in your development environment, which is relatively straightforward to do, no matter which OS development platform you’re using (see here for details).
npx create-next-app@latestOnce you’ve answered a few questions (you can see my answers below; I just went with the defaults), create-next-app will go away and provision everything you need to get started. In my case, this resulted in a my-nextjs-app folder created under my Keycloak project folder; I’d created it in the Keycloak folder for no other reason than it was just the way I wanted the project organised. All I then needed to do was cd into it.
I use Keycloak as part of my CIAM integration needs, which you can read about in my article here. I’m also sure I could have Vibe’d the creation of the app, but I’m comfortable doing that by myself before jumping into the Vibe process.
Having cd‘d into the my-nextjs-app I ran the following independent commands, letting each complete before issuing the next; the first two to make sure everything was installing and building OK, and the latter to spin up a local instance of the app, which I can test, debug and build upon. Navigating via the browser to localhost:3000 resulted in the default page you get presented with when you first create a Next.js application
npm installnpm run buildnpm run dev
Editing The Code
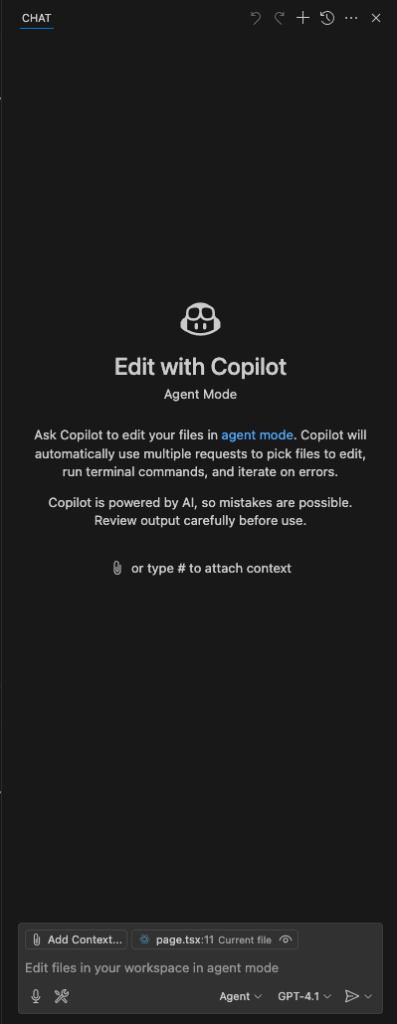
Similar to most, I typically use Visual Studio Code (VSCode) as my edit/integrated development environment of choice. VSCode comes with the integrated Copilot feature, and when using Copilot Chat, you have various options available.
One of those options reflects the LLM — the Large Language Model — and I chose to go with the latest version of GPT (GPT-41 at the time of writing). Others, like Claude 3.5 Sonnet are available, (again at least at the time of writing), and you can configure to add premium models, but as I wanted to keep things simple — and as cheap as possible (in this case, read “free”) — I just stuck with one of the defaults.
Rather than trying to describe every single step of the process in this article, I’ve created an accompanying video here in my Customer Identity series that shows the entire process.
Describing The Problem to AI
Having selected page.tsx in VSCode Explorer — I don’t know if I needed to select page.tsx per se, but as with most things AI, giving as much context as possible is key, and page.tsx represented a page I wanted to protect — I opened up a Copilot Chat window and typed the first request to integrate OIDC authentication into my app, which went something like this:
add authentication via OIDC to my Next.js 15.3.2 application As you can see from the accompanying video, Copilot made some changes to various files and added some dependencies, and you can see the modifications that have been made. There are a couple of issues, but let’s just go ahead and accept all the modifications for the moment.
Code Fixing With AI
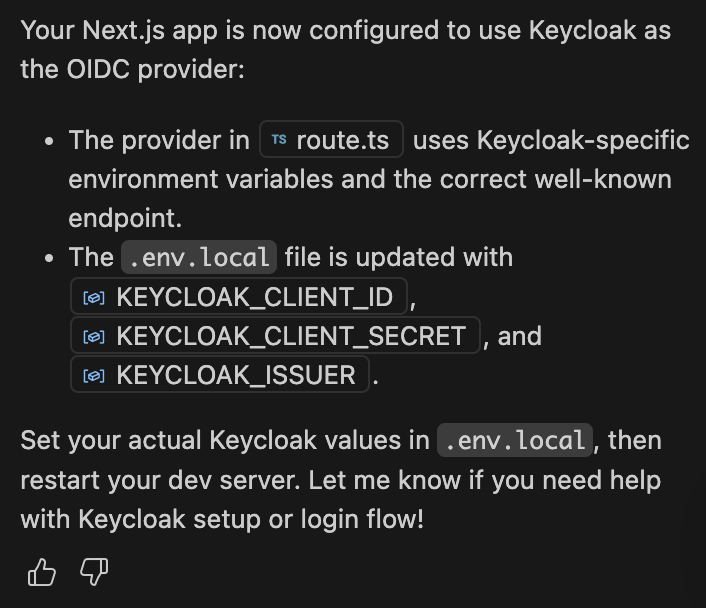
The main issue with the changes Copilot added is that "next-auth/providers" can’t be found, so having selected route.ts let’s go ahead and ask Copilot to fix the problem. For the duration of a chat, Copilot will retain context, so it should be cognisant of what’s already been done:
update to use Keycloak as the OIDC provider As you can see in the video, it’s made an attempt, and I’ve accepted the changes it suggested. However, it didn’t fully fix the problem; I could have probably tried another Copilot prompt, but instead, I chose to intervene and manually update to use the Keycloak out-of-box definition provided by the NextAuth SDK — at the same time taking the opportunity to clean up the code by removing some of the options not required (in this case, just accepting the defaults as documented here).
Module Resolution
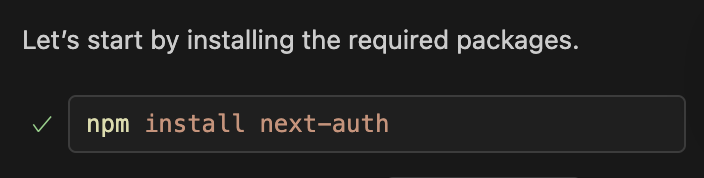
The other problem I ran into was that the Next.js development runtime couldn’t resolve access to the next-auth module. This turned out to be because the Copilot page installation, whilst having installed next-auth, hadn’t actually added this to the modules list in package.json (on which the Next.js development runtime is dependent). Again, I fixed this manually, by simply rerunning the command Copilot said it had run (i.e. npm install next-auth), this time from the command line.
Server-Side Rendering
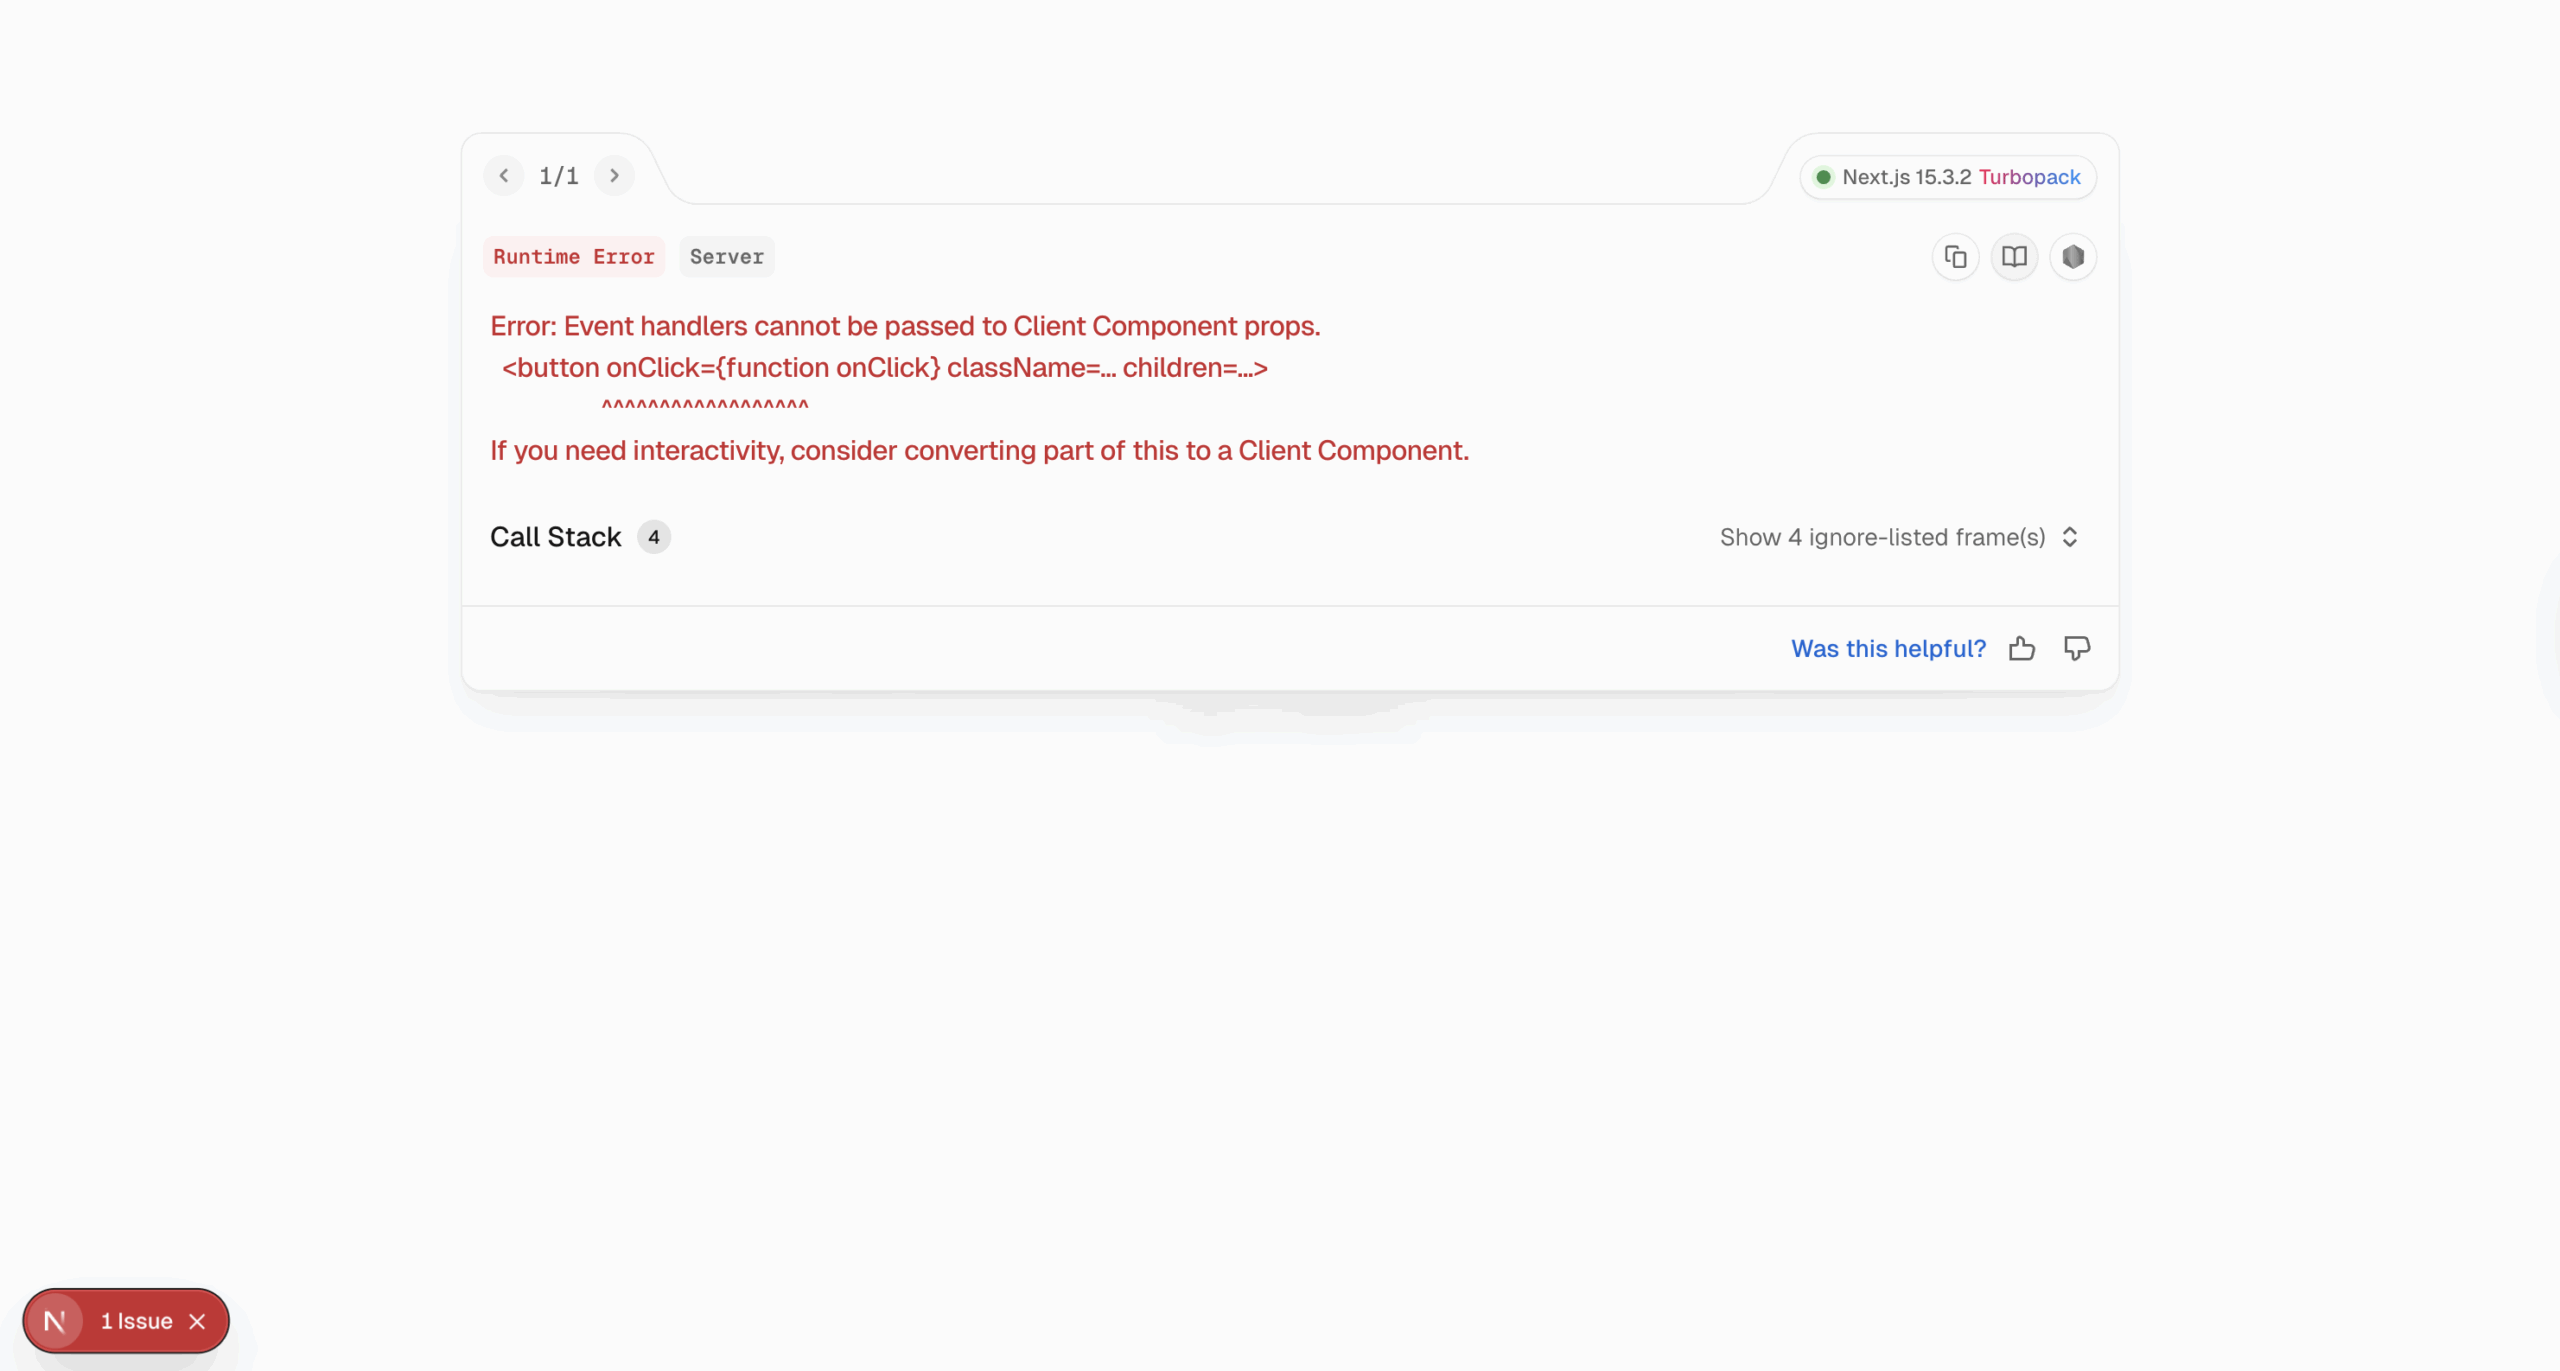
By default, Copilot AI has also added client-side rendering functionality for the buttons for Sign In and Sign Out, which is incompatible with server-side rendering. Again, though, it’s a relatively easy fix, which, with the page.tsx file selected, can be accomplished by using another Copilot prompt:
Next.js projects are, by default, regular web applications, performing server-side rendering. For more details on this and the various rendering options available to a Next.js application, visit the official documentation here.
fix signIn and signOut for server side rendering Dependencies
Generative AI is quite “human” in that it’s not necessarily deterministic — i.e. doesn’t always come up with the same result(s) for the same prompt. Interestingly, in my experiments, at least when using the GPT-41 LLM, Copilot comes back with a narrative that almost always suggests using NextAuth SDK as a dependency for a CIAM integration, and most of the time picks Keycloak as the IdP (amongst others like Auth0). Somewhat egotistically, at least from the perspective of choosing an IdP, I was left wondering if the AI had been “reading” my previous article 😉:
Of course, if you don’t have a Keycloak instance set up, then you’ll have some additional work to do. You could opt to follow the official Keycloak documentation here, or check out Milan Jovanović‘s video here, which does a really nice job of illustrating how to get a Keycloak instance up and running for authentication.
Alternatively, a 3rd-party hosting service like Phase Two offers a free “Starter” deployment on their shared cluster; being primarily an enterprise-level IAM vendor, Phase Two managed hosting has arguably aggressive pricing for production-level deployments, however, their free tier should be good enough for prototyping and testing (if nothing else).
Last but not least, you can always use a 3rd party SaaS CIAM solution provider like Auth0, as Copilot suggests, particularly if the DIY route isn’t one you’re looking to take.
I’ve been working on my own set of articles about Keycloak, and my journey setting up a production-ready Keycloak deployment for the B2C and B2B SaaS projects I’m building. Those, however, are stories to share another time 🤗 In the meantime, Phase Two free tier for Keycloak works well, and they even have a blog post about securing Next.js apps using it too: see here for more details.
Using an SDK
Copilot installs the NextAuth SDK, and you can read more about NextAuth at https://next-auth.js.org (or the new https://authjs.dev site, which also provides easy access to some of the other framework integrations). The NextAuth SDK is free of charge and is also CIAM platform-agnostic, as in it should work no matter which IdP you choose to use. In most cases, a (vendor-supplied) SDK will be offered free of charge and/or provided as an open-source component/library.
If a third-party vendor charges for or requires the use of an SDK, the chances of vendor lock-in will likely increase; situations such as these most likely signal the use of some non-standard vendor-specific functionality that may not be available if you choose to move to another provider.
The Nimbus OAuth 2.0 SDK with OpenID Connect extensions by Connect2id is another CIAM platform-agnostic SDK, in this case for Java. However, it’s not one I’ve personally used.
A Software Development Kit, or SDK as it’s better known, typically provides an efficient out-of-box solution when it comes to integrating functionality within an application, and using one should make your life easier as a developer. At least for the majority of cases.
There are cases, however, where an SDK doesn’t quite provide the level of seamless efficiency a developer would hope for — e.g. where an SDK doesn’t quite fit the execution model required, or where a breaking change in an upgrade of an SDK is either unavoidable or unintended (as illustrated in a recent post).
Whilst leveraging an SDK can arguably be extremely useful, particularly when it comes to speed of integration and/or isolation from the subtle nuances of using an implementation — API parameters and parameter formats, for example — standards-based approaches (particularly those involving the use of an API; see my article entitled An API-First Approach to CIAM for more on that) shouldn’t require you to use any particular or specific SDK.
Also, when it comes to best-practice recommendations in terms of the secure storage of ID Tokens, Access Tokens and other security artefacts, using an SDK should shield you from the associated subtle vagaries of standards and the like, and also provide a clear explanation when it comes to changes in policy regarding these. Arguably, for this reason alone, it’s usually preferable to use a (vendor-provided) SDK — though sometimes it doesn’t always feel that way.
SDKs vs Plugins
Similar to using an SDK, some environments — particularly those associated with technology stack frameworks or scaffolding, e.g. WordPress — use Plugins, as components to extend or enhance system functionality. These shouldn’t be confused with SDKs as they serve a different purpose; third-party vendors, like Auth0 and MiniOrange, provide OIDC-compatible services via plugin, however, the topic of plugins is beyond the scope of this article.
Bespoke Implementation
As an alternative to using an SDK or a Plugin — or in some cases, in addition to using either of these — a bespoke implementation can also be created by following the standards-based workflow as defined by the Authorization Code Flow protocol.
Configuring Keycloak
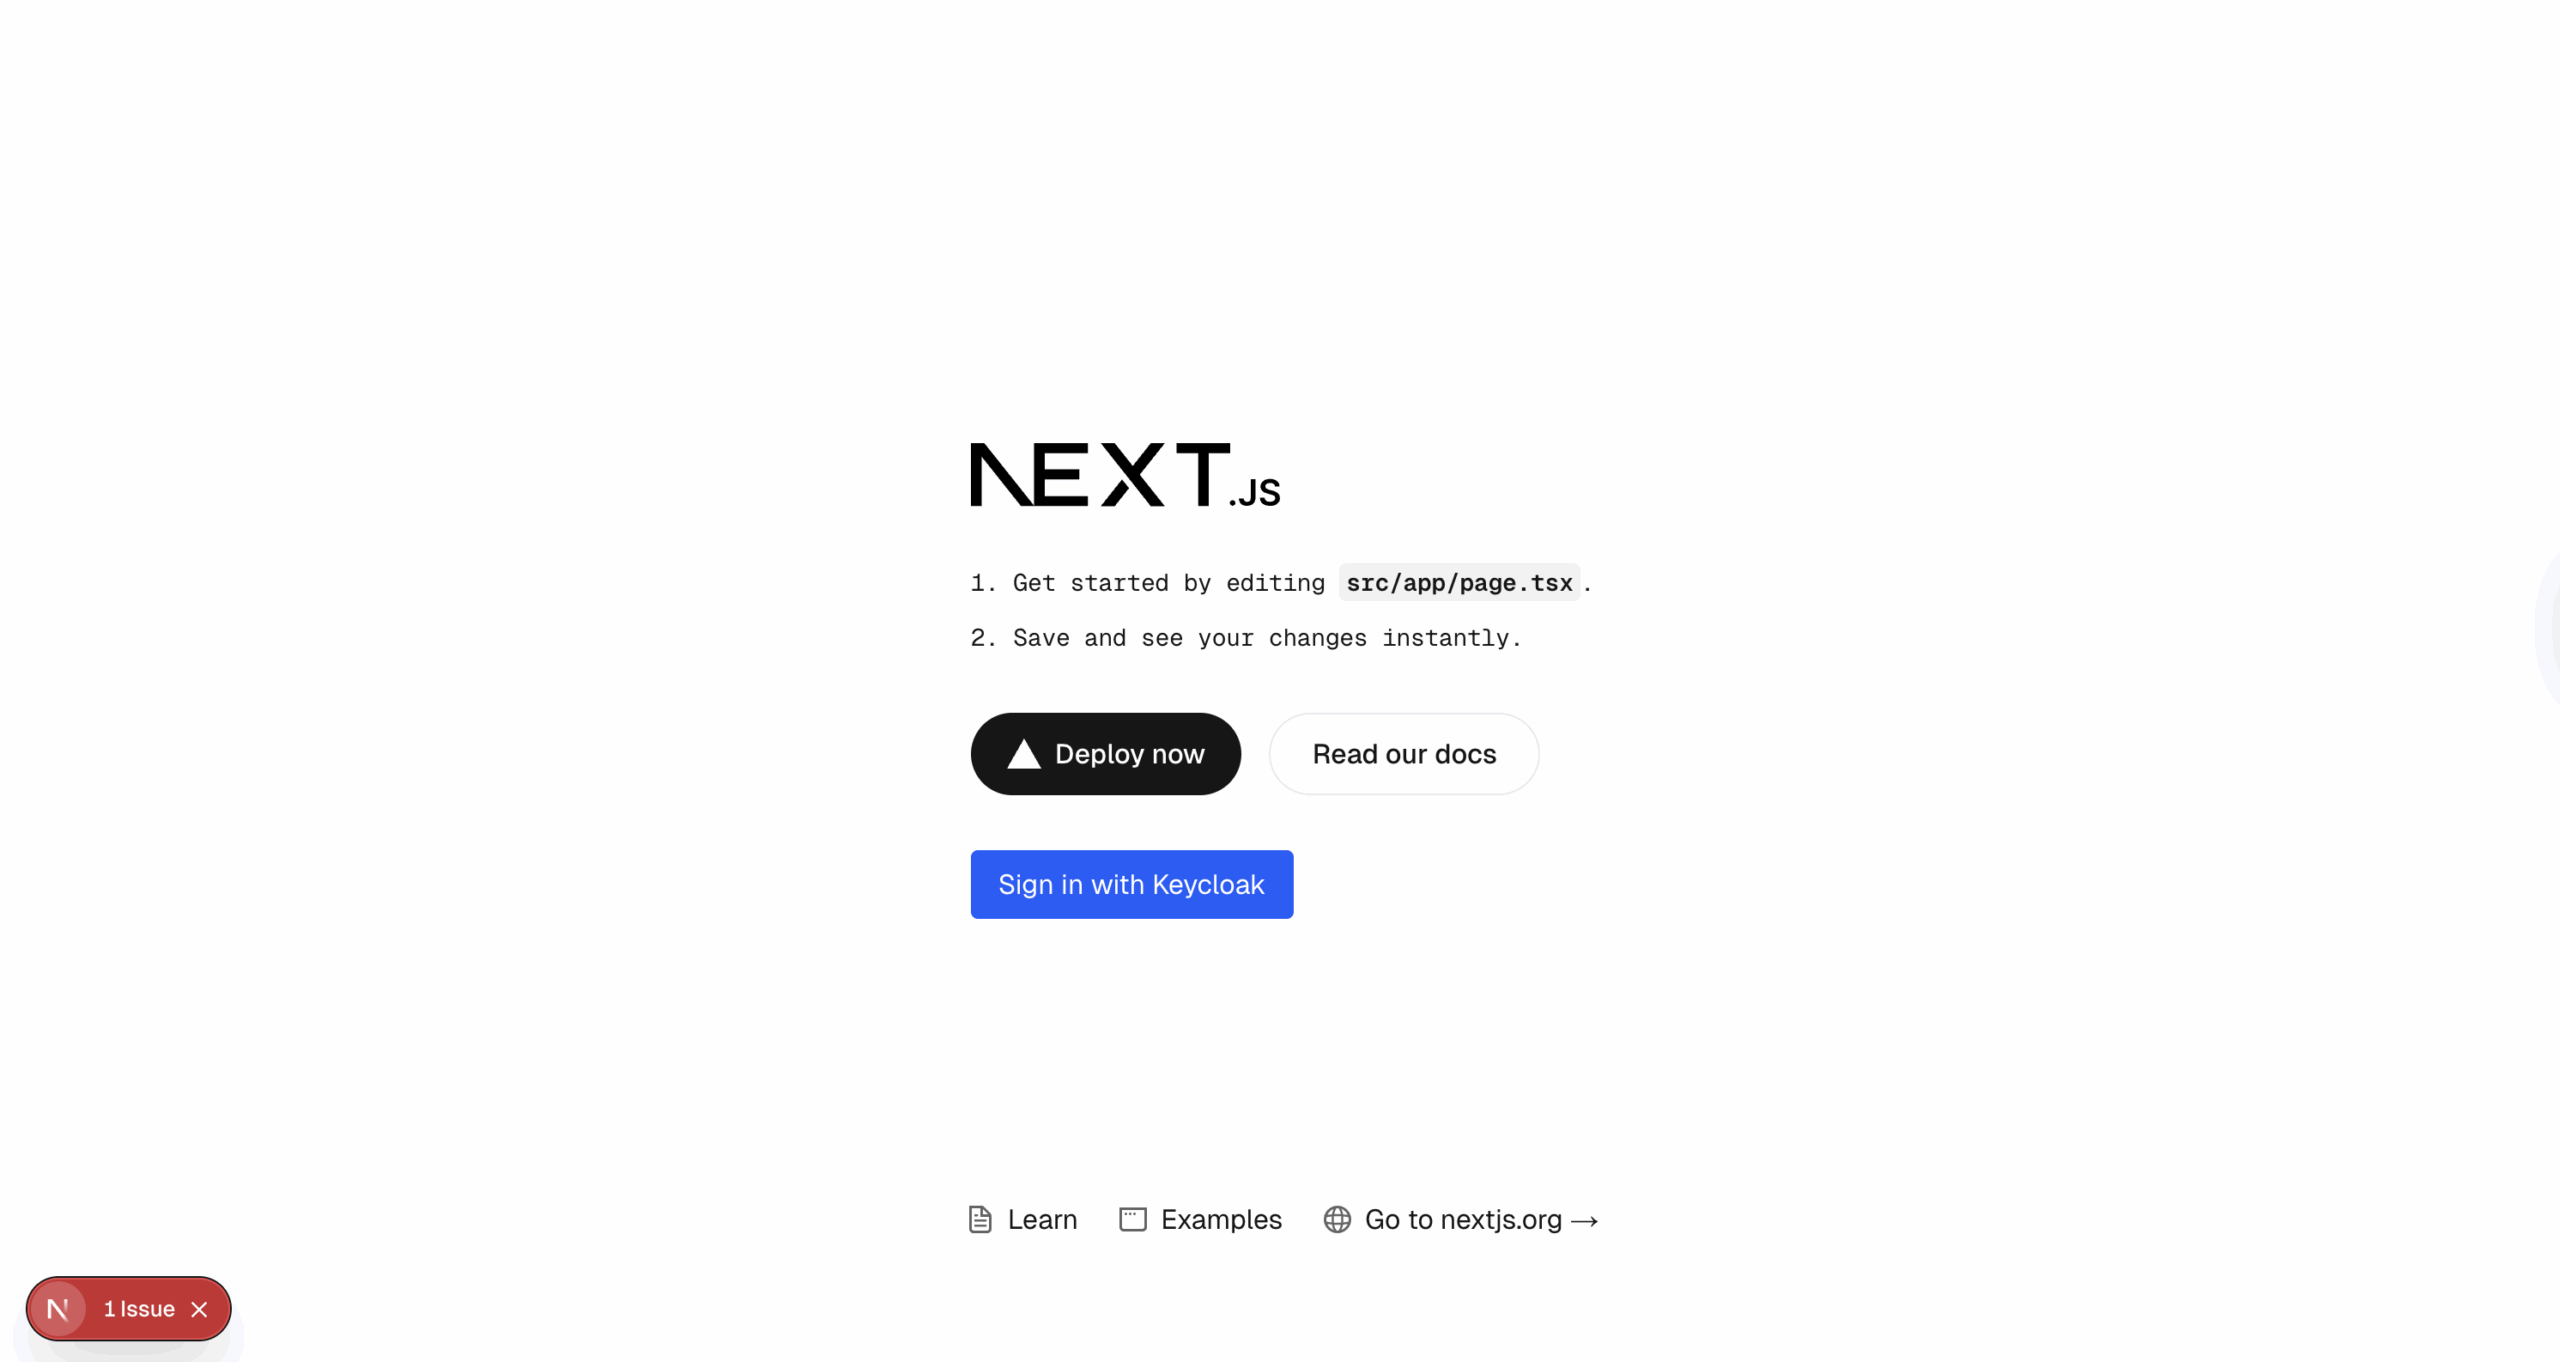
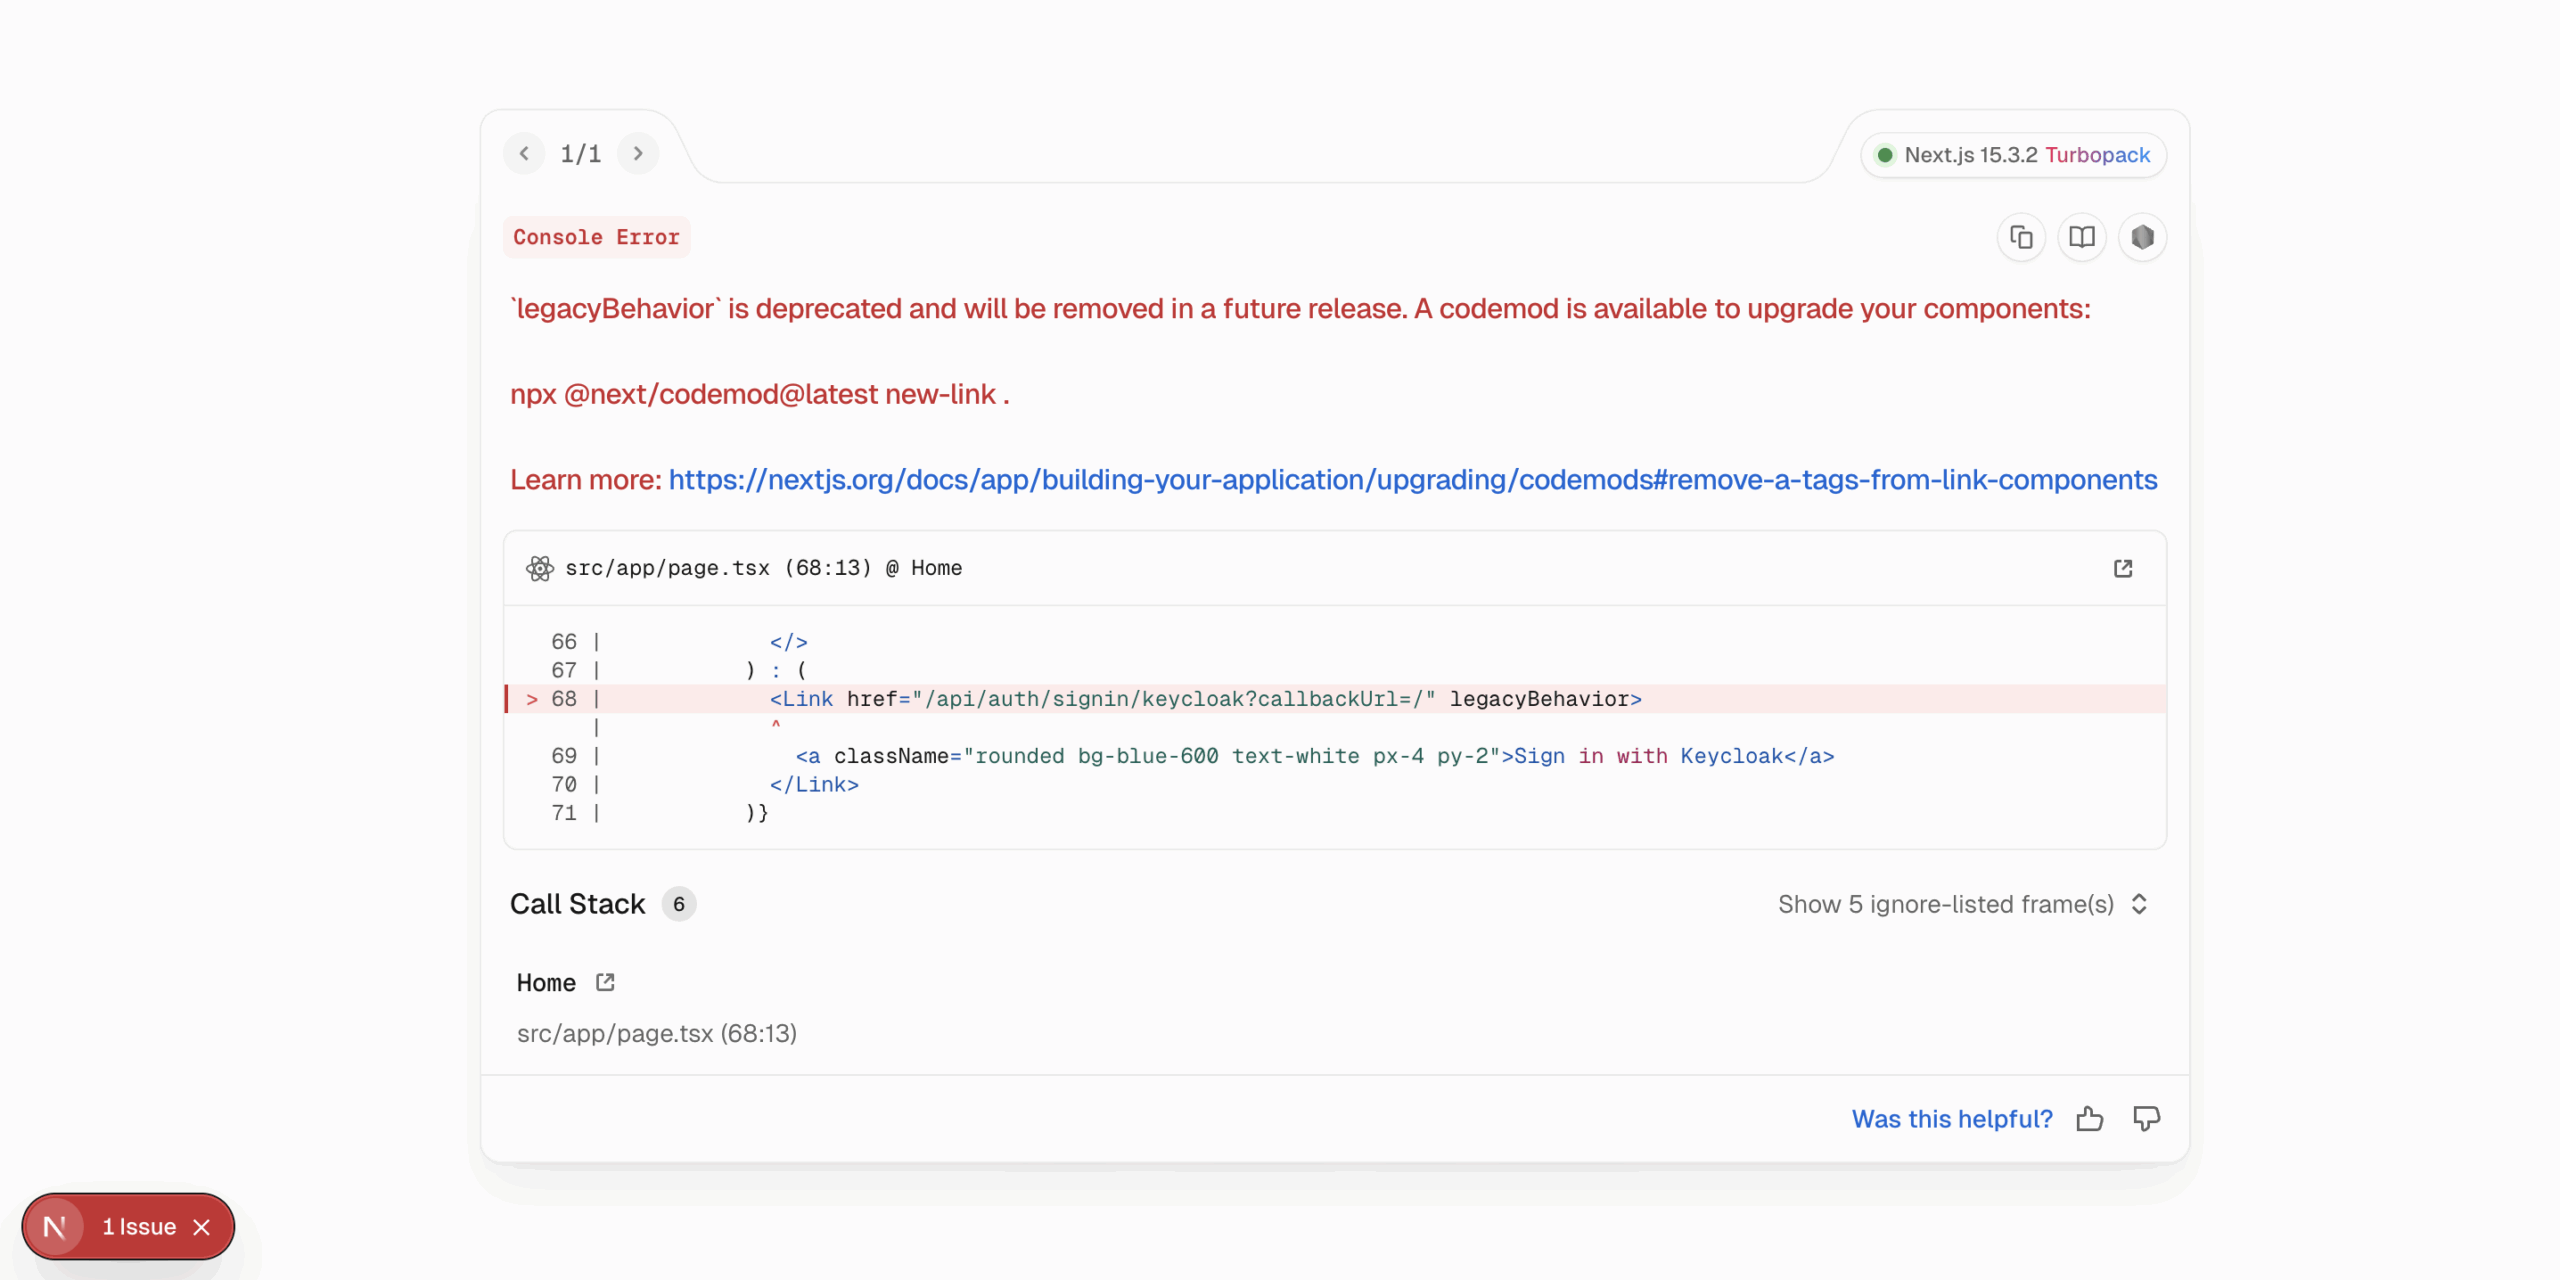
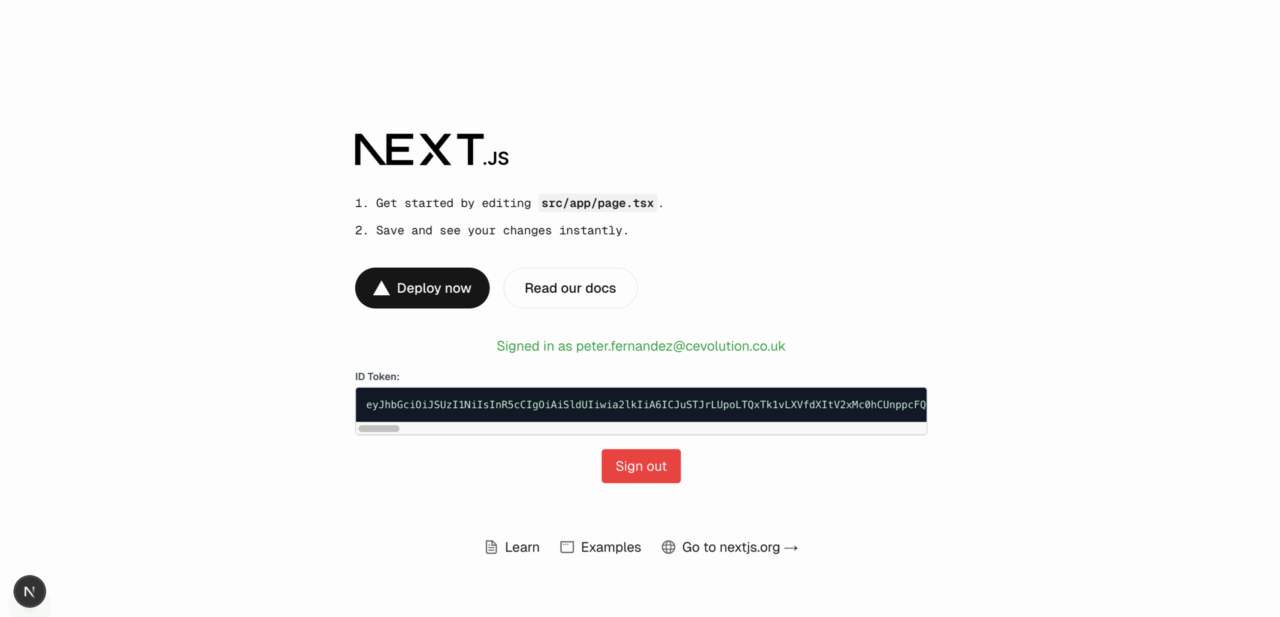
With the changes Copilot has made, I now get something that looks like the following when I navigate to my application (i.e. https://localhost:3000). It appears we still have an issue, but it’s an issue with using “legacy behaviour”, so let’s just ignore it for the moment; besides, I’ve left this as one of the follow-up exercises should you be up for the challenge 😁
As previously mentioned, rather than trying to describe every single step of the process in this article, I’ve created an accompanying video here in my Customer Identity series that shows the entire process. If you’re not following along, or you’ve not yet checked it out, I’d highly recommend you do when you have the chance.
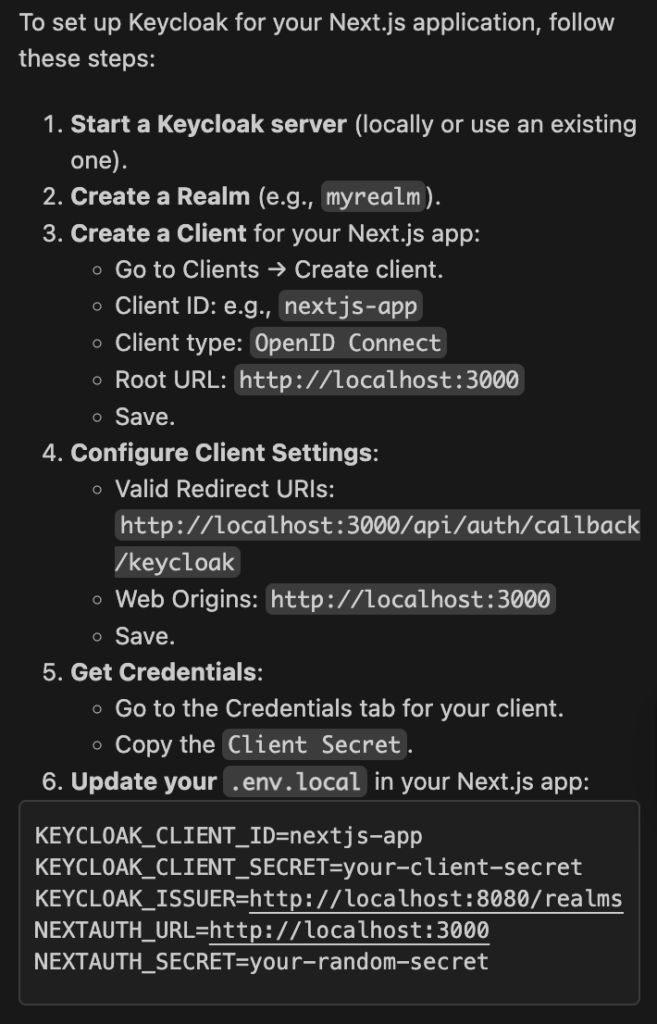
For the eagle-eyed among you who’ve watched (or are watching) my accompanying video, you’ll recall that Copilot asked me to let it know if I needed help with Keycloak setup; here’s the excerpt from the chat I’m talking about, together with my next request presented to Copilot (remember the Copilot chat retains context, so I can leverage the conversation I’ve already been having):
Help me setup Keycloak for my application Below is the salient part of the response provided. There are a few things that are beyond the scope of this article — i.e. setting up a Keycloak server and configuring a Realm — which I’ll be covering in more detail in the future, so for now let’s just concentrate on creating and configuring a Keycloak Client that we can use for the remainder of the project.
You can read more about Keycloak configuration in the official documentation here, or check out Milan Jovanović‘s video here, which does a nice job of illustrating how to get a Keycloak instance up and running for authentication. As previously mentioned, Phase Two also offers guidance in the blog post here.
Client Definition
In the context of Authorization Code Flow (and OIDC/OAuth 2.0 in general), a Client is generally defined as an application that requests access to protected resources on behalf of a user (or resource owner). This could be a web application, a mobile app, etc.
More specifically, a Client represents a thing that requests access to protected resources on behalf of a user (or indeed resources belonging to it, in its own right), which might be an application, a specific context within an application (such as a specific route), or something else entirely. What a Client is, or could be, is beyond the scope of this article, so let’s just go with application for now.
Let’s also go with the recommendations made by Copilot for now. However, in a future article, I’m going to explain why opting for a more obfuscated Client ID is a better practice, particularly when it comes to hardening your CIAM integration.
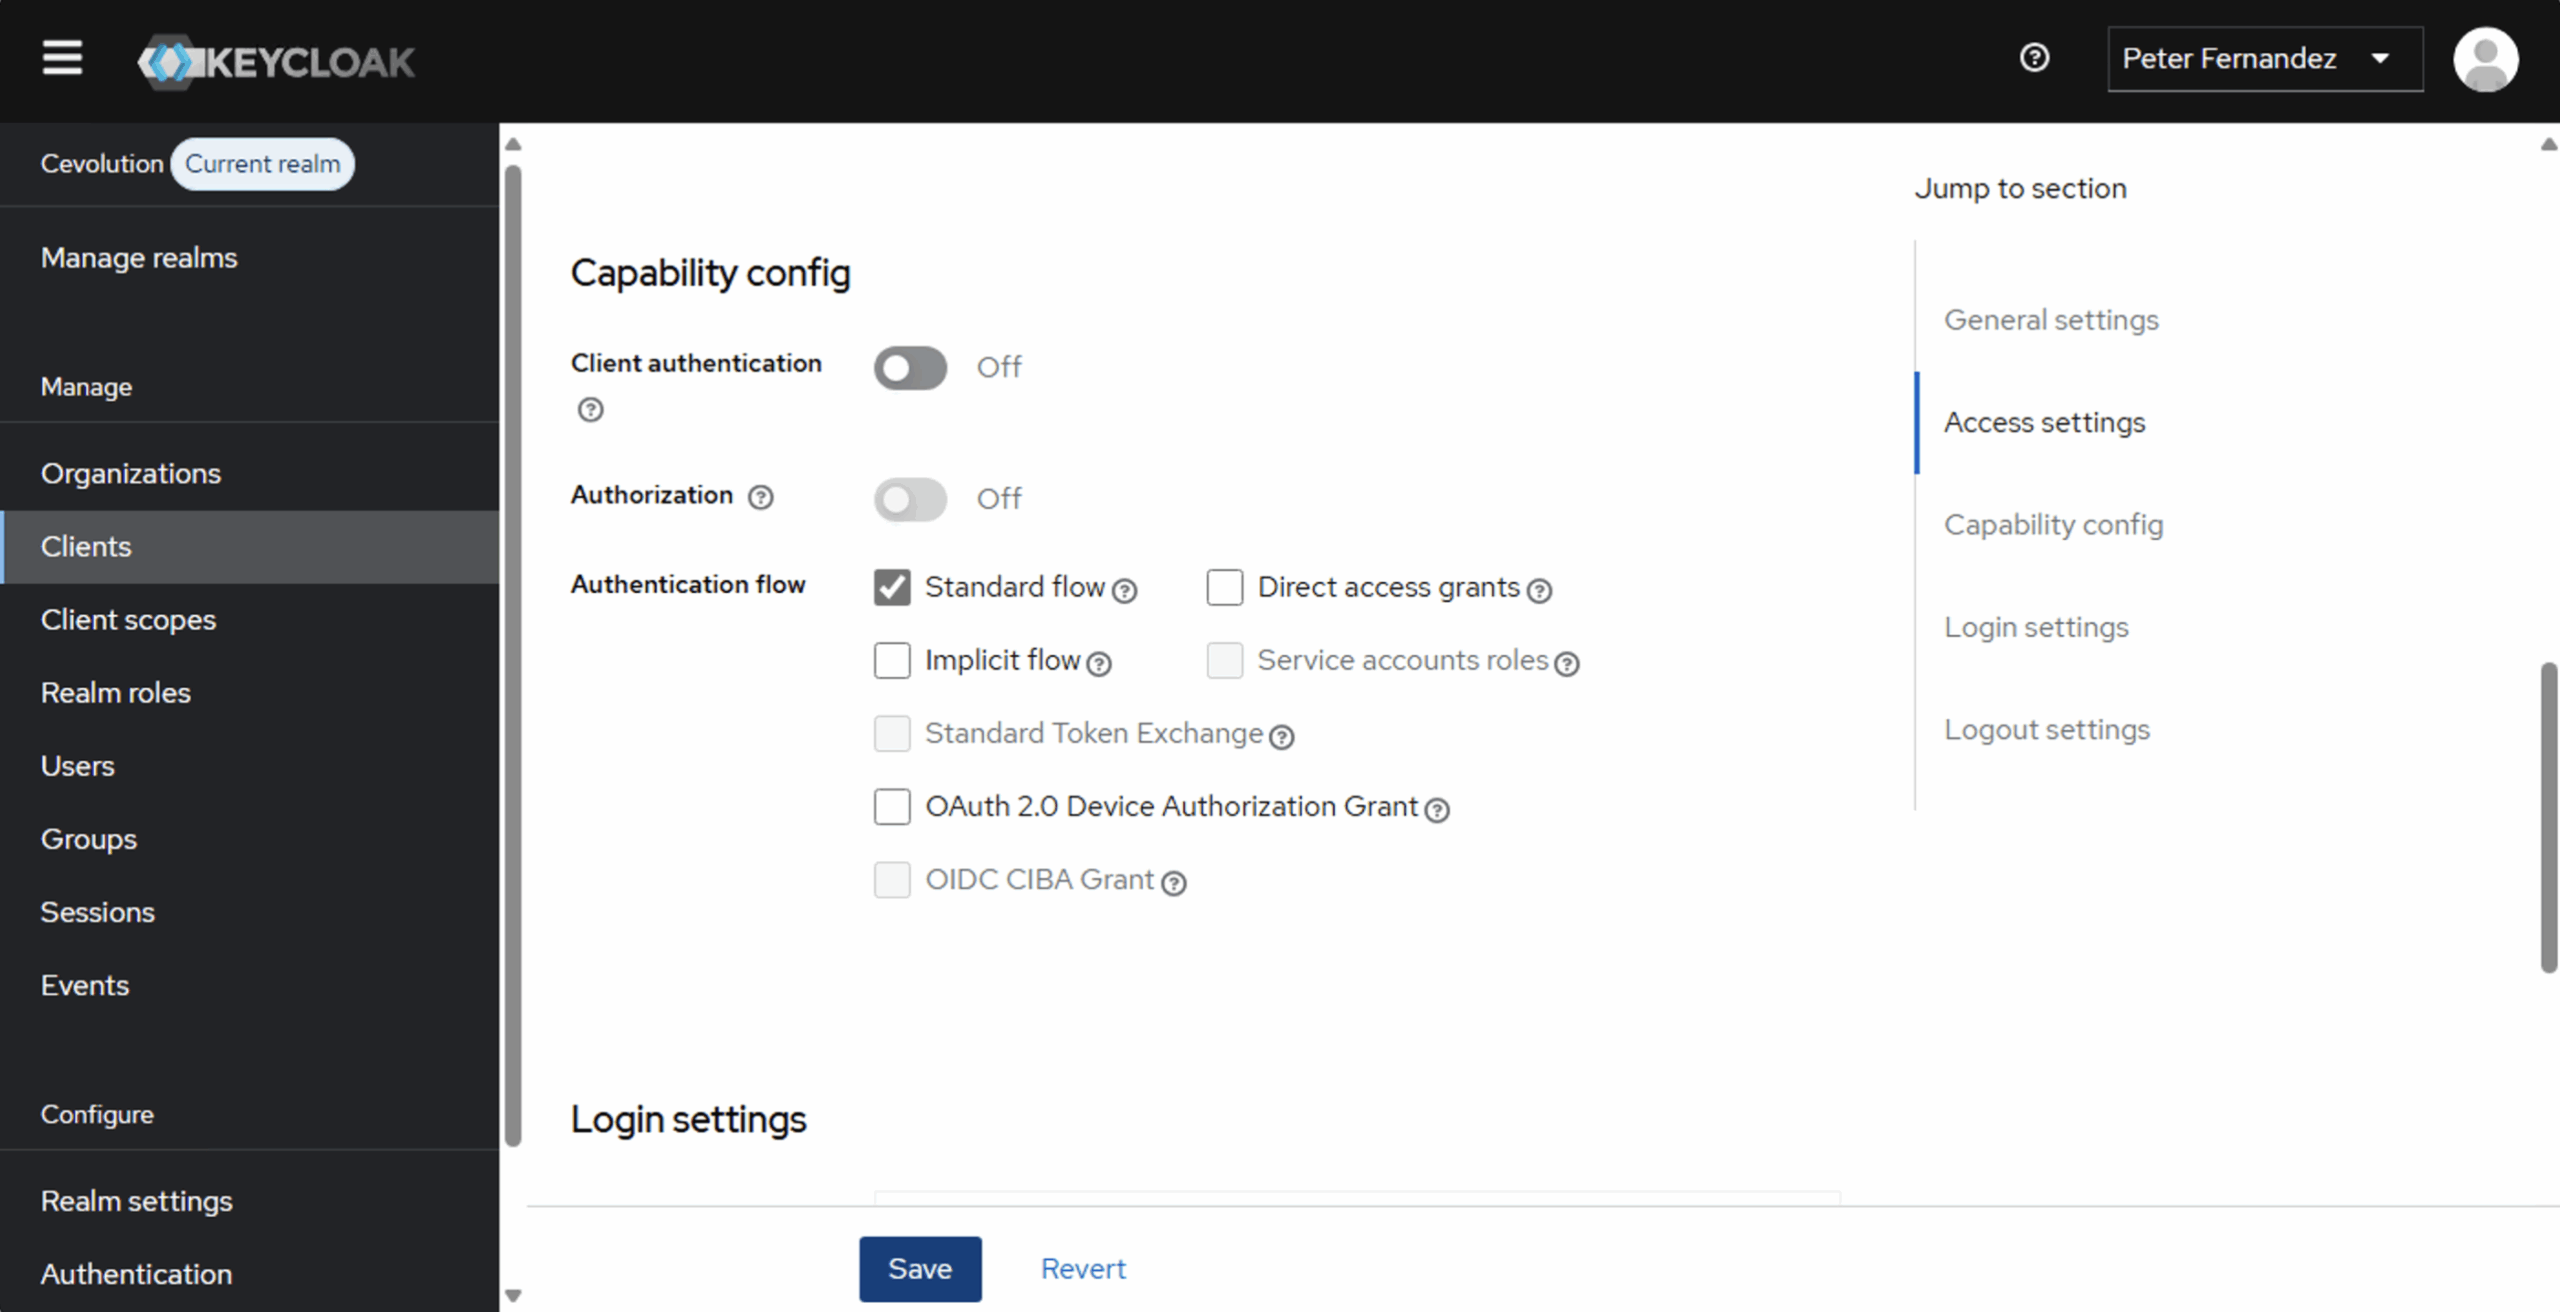
Here are a couple of screenshots taken from the Keycloak management dashboard (for my Cevolution realm; something I’ll be covering in future articles), showing the Client definition I created based on the Copilot steps described above.
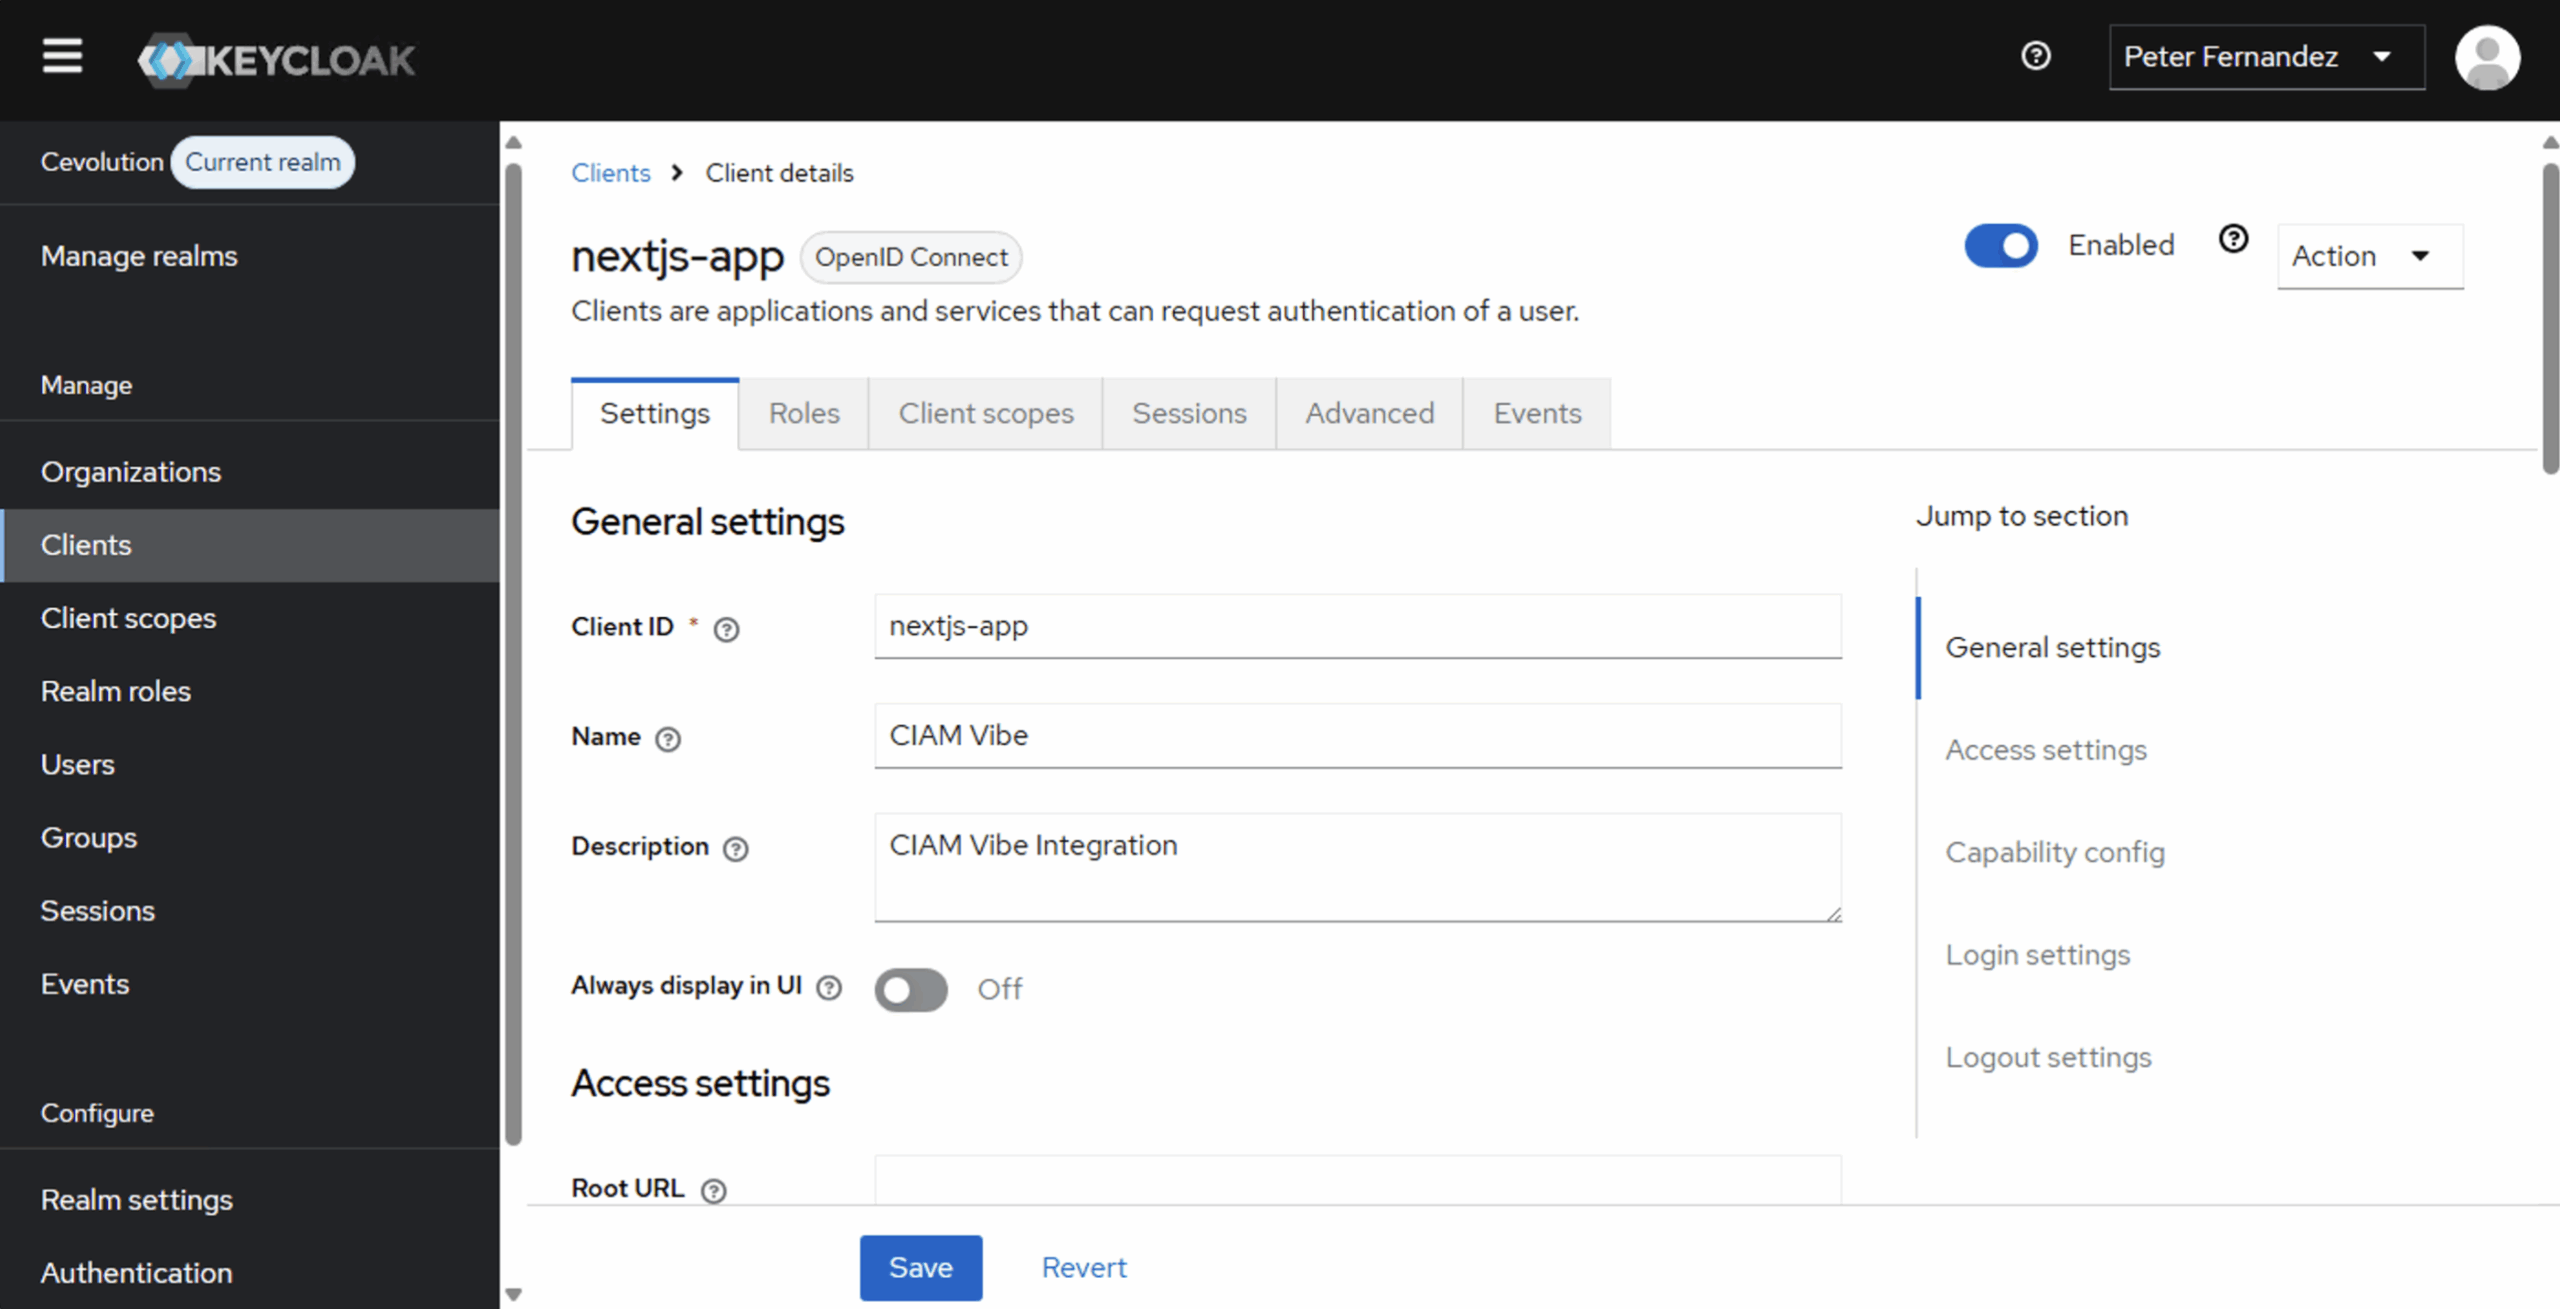
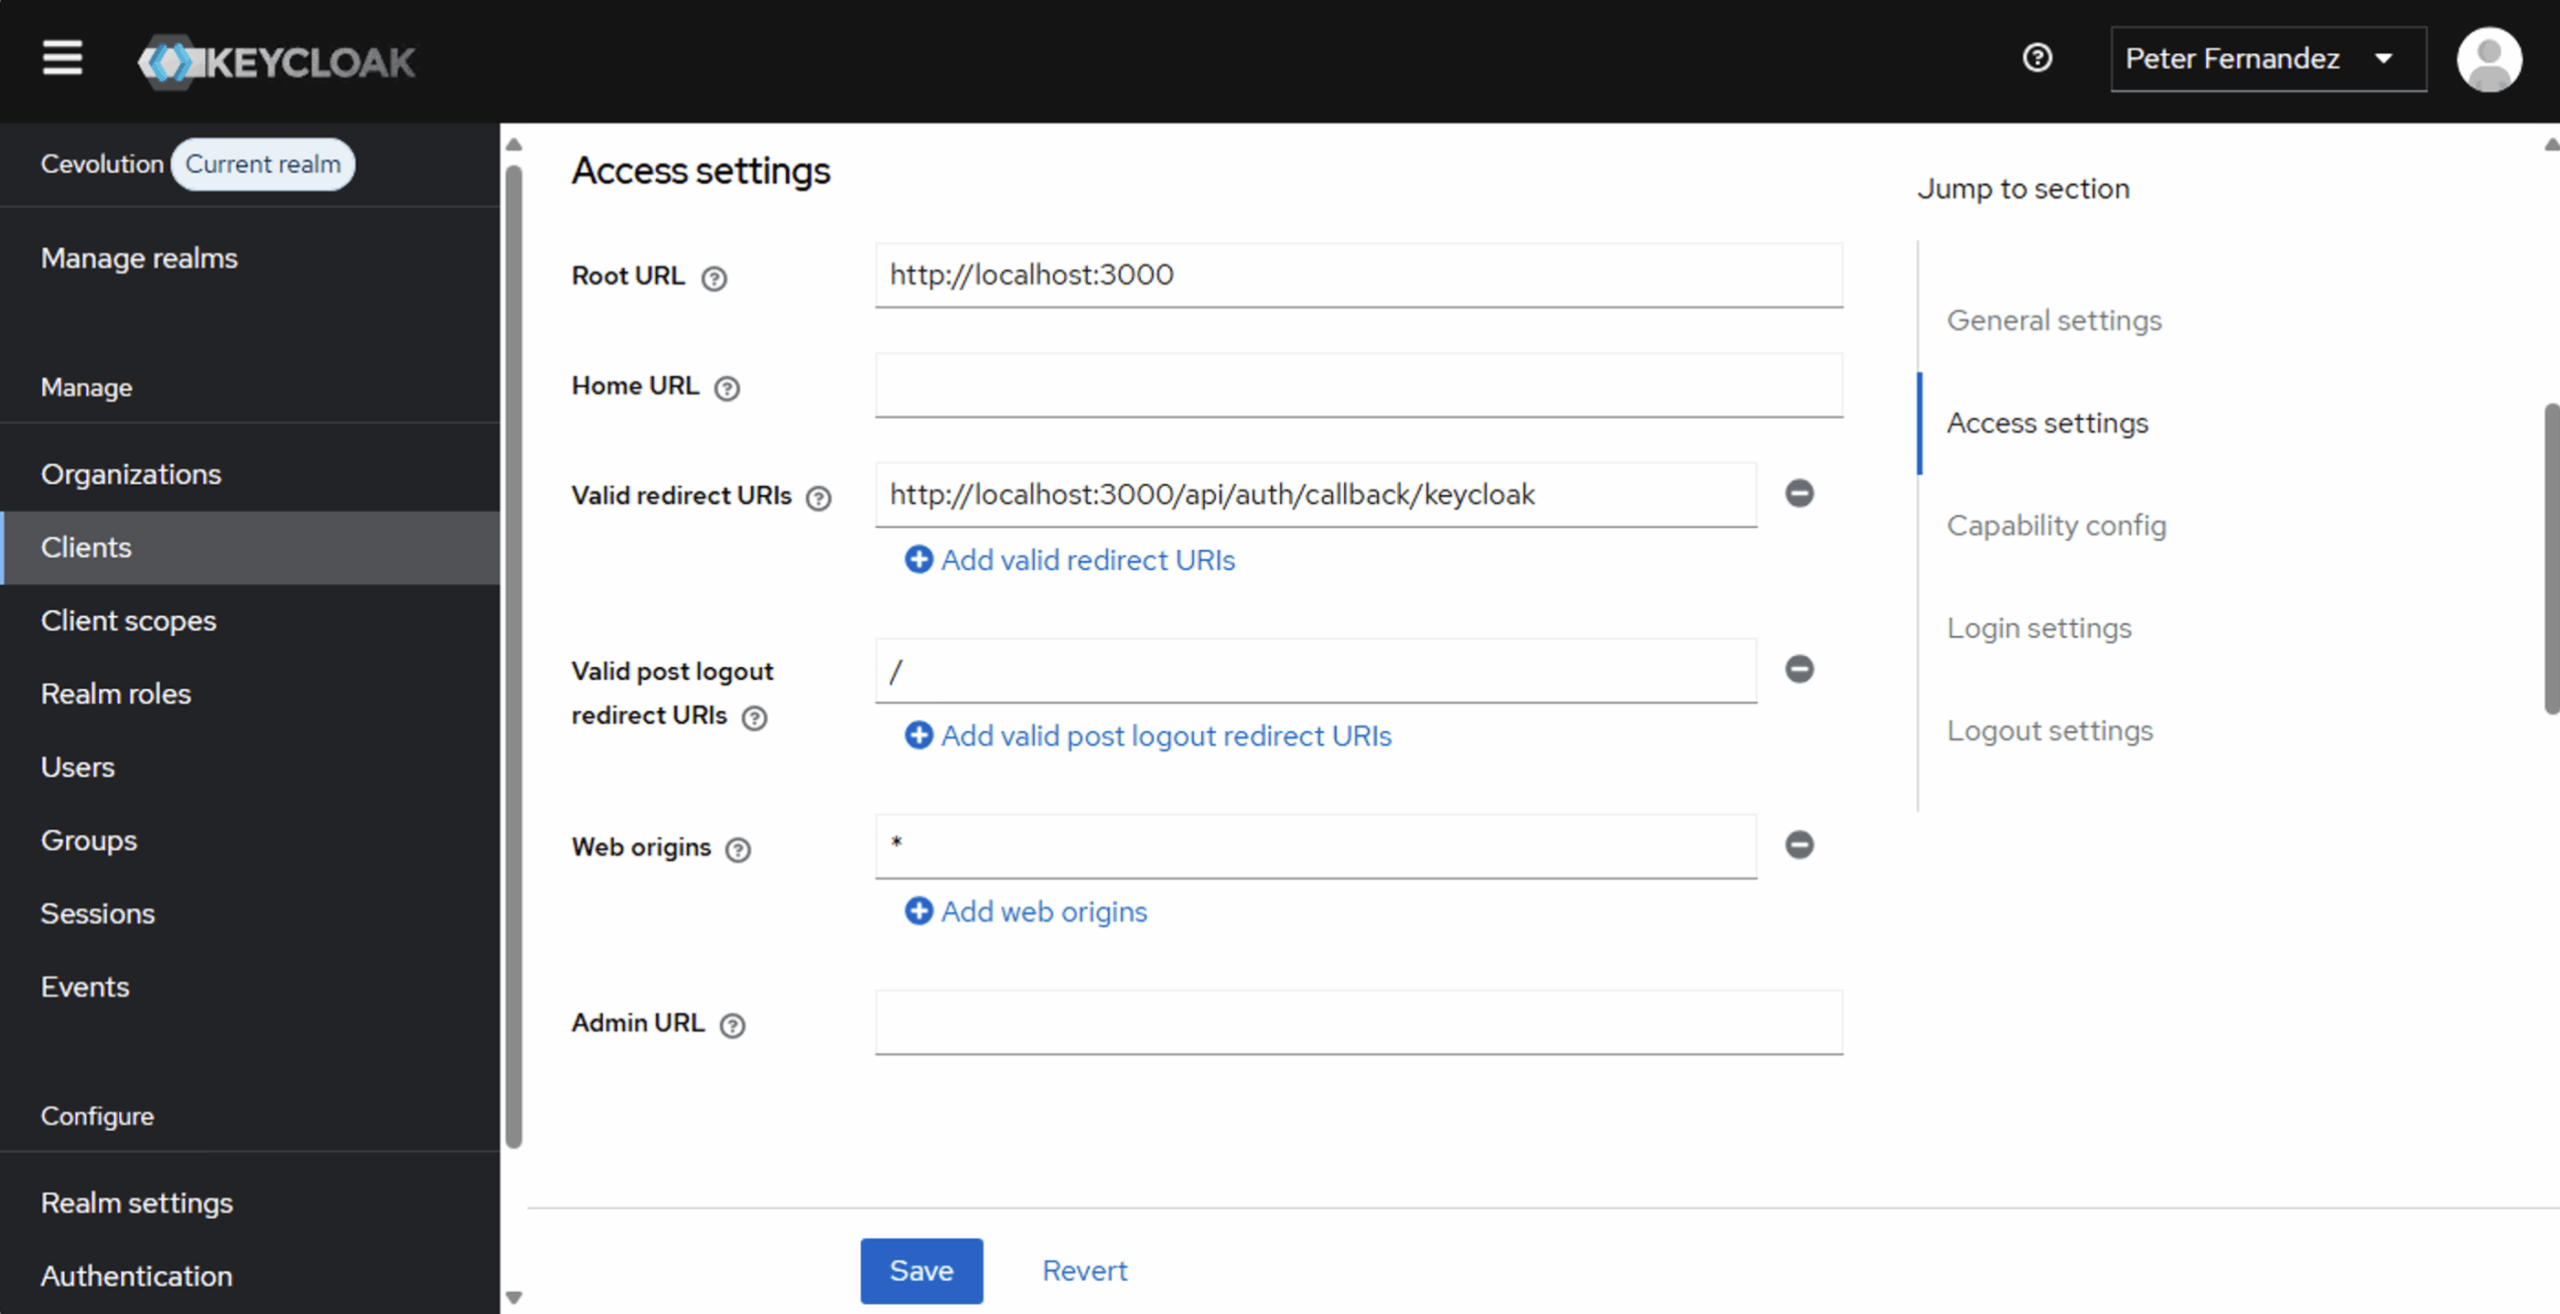
There are numerous configuration options for a Client within Keycloak, ranging from specific definitions that control the theme used for Login and the various other user interface screens, to available scopes, roles (from an RBAC perspective) and the Keycloak events that get triggered as part of user interaction.
All of these are beyond the scope of this article, but I will be sharing more regarding these in the future. However, with the information we have, we can now update the env.local that Copilot created, as described in step 6 (above), and in doing so, there are a few points to note:
I really like that Copilot created an env.local because this is typically a file you won’t check into version control. That’s important because it signifies that there is security-sensitive information that should never be tracked outside of the environment in which the application is running! +1 for security-conscious AI! 🤖
- We haven’t generated the
NEXTAUTH_SECRET. I’m not actually sure what this is for 🤷🏻♂️ If you know, please comment below. It will likely be used by NextAuth.js as part of the artefacts — i.e. cookies, et al — it generates, and as this is a non-production application, you can leave it as-is for now. Or, alternatively, you can use a site like RandomKeygen to quickly generate something that can be used as a random secret. - We don’t yet know the
KEYCLOAK_ISSUER. This is the realm-qualified URL on which Keycloak responds. Depending on how you are employing Keycloak (as discussed in the dependencies section above), this could be anything fromhttp://localhost:8080/realms/myrealm, for a locally hosted Docker deployment to something likehttps://euc1.auth.ac/realms/myrealmfor a hosted solution. - We don’t yet have the
KEYCLOAK_CLIENT_SECRET. In fact, we don’t actually need it at this point. Contrary to the NextAuth.js documentation for Keycloak (here), which recommends configuration as a confidential client, the latest version of the NextAuth.js SDK I was using seems to treat the application as a public client and prefers to use PKCE (as opposed to the Client Secret) when executing Authorization Code Flow. The latest version of Keycloak automatically detects the use of PKCE and adjusts accordingly; if I change the definition of the Client to requireClient authentication(illustrated in the image below, and the way you tell Keycloak it’s a confidential client and that it should generate/require a Client Secret), the authentication will fail at the point of code exchange.
Authorization Code Flow in Action
With everything updated let’s see the whole thing in action; I’m going to let my video self take it from here and you can watch the Vibe coded CIAM integration via Authorization Code Flow unfold in my accompanying video in the Customer Identity series.
In the video, the Keycloak installation shown follows the DIY approach to CIAM that I’m taking, and as discussed in a previous article entitled Build, Buy or DIY your CIAM Solution. I’m also illustrating aspects of SSO that you can also read more about in another one of my previous articles:
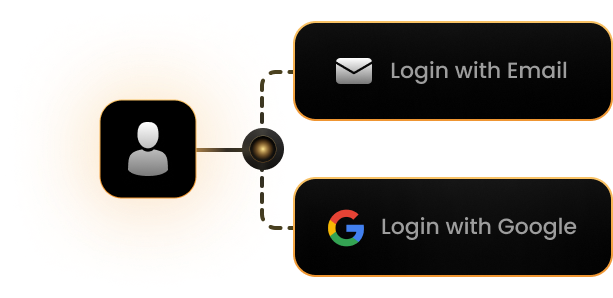
- Account Linking: to ensure that a user profile is consistent, no matter how they choose to authenticate. Account linking also provides users with options should any one of their preferred first-factor authentication choices — in this case, upstream Social IdP‘s — be unavailable for whatever reason.
- Social Authentication: to provide a password-free solution as part of the login process. This isn’t passwordless authentication per se — as a user would experience with the likes of Passkeys et al — but instead provides for userid and password processing by an upstream 3rd party IdP….thus potentially reducing costs whether your are going down the route of leveraging a CIAM solution provided by a 3rd party SaaS vendor, or taking a DIY approach.
Followup Exercises
Hopefully, this is just the start of your vibe coding journey 😎 For now though, I’m going to leave a few follow up exercises for you to consider and “get your teeth into”, as it were, at your leisure — ideally working with the Copilot AI collabroatively to try and solve the challenges:
- Removing NextAuth.js Signin/Signout Screens. By default, the NextAuth SDK provides an integrated UX (User Experience) that isn’t typically required when leveraging an application-independent IdP — after all, it’s a best practice for the IdP to provide the UI (User Interface) that offers the choice of first-factor authenticator rather than this being embedded within the application. Fortunately, this default behaviour can be modified, and the NextAuth.js documentation here may well provide a helping hand.
- Sign out from the IdP when signing out from the application. As standard, a session will typically remain with the IdP once an application logout occurs; this is often the desired behaviour and a cornerstone of SSO. However, it’s not always the case that this is what’s required — with some applications, you may actually want the user to perform interactive login again once an application logout has occurred.
- Locally hosting via
HTTPS. Whilst Next.js defaults to using HTTP when doing local development, it’s always a recommended best practice to use TLS — i.e. HTTPS — when deploying to production. Fortunately, Next.js does provide an experimental facility to allow you to test locally using HTTPS, so perhaps give that a try to verify that there’ll be no unforeseen issues when you publish your application; check out the Next.js docs here for more details. - Fixing Legacy Behaviour. As discussed in the section above, there’s a remaining
legacyBehaviourdepreciation notice reported by the Next.js development runtime (illustrated below), which should be a relatively easy fix to accomplish in a vibe-coded style with the aid of Copilot 🤗


Leave a Reply